A friend of mine who is expecting her first baby recently travelled to Africa to work for 5 weeks. Upon her return, her mom planned a baby shower in which all the guests would create one square to be quilted together into a blanket for the baby. The quilt's border fabric was adorable safari-themed prints, and most of the guests chose safari-themes and African animals to decorate our squares. When I was invited to make a cake for the shower, naturally I wanted to continue the safari theme.

I started by looking and photos both of animals and animal-shaped cakes to get ideas. I decided on a lion's head, because just doing the face (as opposed to the outline of the body in profile) for any animal fits with the shape of cake better and reduces waste. We were expecting over 20 people at the party, so I wanted a design that be fun and themeatic as well as ready to serve a crowd. Once I had my decorating ideas established, I had to choose a recipe for the actual cake. In searching for the designs, I had also come across the Zebra cake on a couple of different blogs. What more perfect and completely literal way to represent a lion cake than to have a zebra inside!?!

I found the recipe on multiple blogs and it all appeared in exactly the same ratios. While I am usually fairly comfortable making adjustments, given the special viscosity of the batter and how it rises, I was careful in how I altered the ingredients. The technique would probably work with some other batters, but they would still need to be liquid enough to spread evenly while having enough structure to rise. The King Arthur flour's blog does a great job of documenting the making of this cake and spelling out the recipe.
The make enough cake for 20 people, I wanted to do a two-layer cake, plus have enough to bake in a smaller pan to form the "nose" of the lion. So I made a double recipe, keeping the first batch as plain vanilla, and then making the second full batch just as chocolate. In both batches, I cut back the oil to 3/4 cup (from 1 cup) and found the cake to have ample moistness. With the chocolate, in an attempt to dress it up slightly, I replaced the milk in the second batch with buttermilk (a common ingredient in chocolate cakes), used 6 T dutch cocoa (as called for for a double-recipe), and since I had already cut back on the oil, I also added a couple tablespoons of chocolate syrup. While I enjoyed the cake layers quite a bit, the individual flavors and textures of the specific vanilla or chocolate stripes were not especially pronounced, and ultimately, I don't think my changes to the chocolate mix added anything to the finished product.


 |
| The batter is poured into quantities of about 3 tablespoons into the center of the pan to form concentric rings; the laws of cake physics are such that it spreads and rises to form excellent zebra stripes in each slice of baked cake! |
 |
| The baked layer, top. |
 |
| The baked layer, bottom (side touching the pan) - I found it interesting, though not especially surprising, I guess, that the chocolate batter sunk to the bottom. |
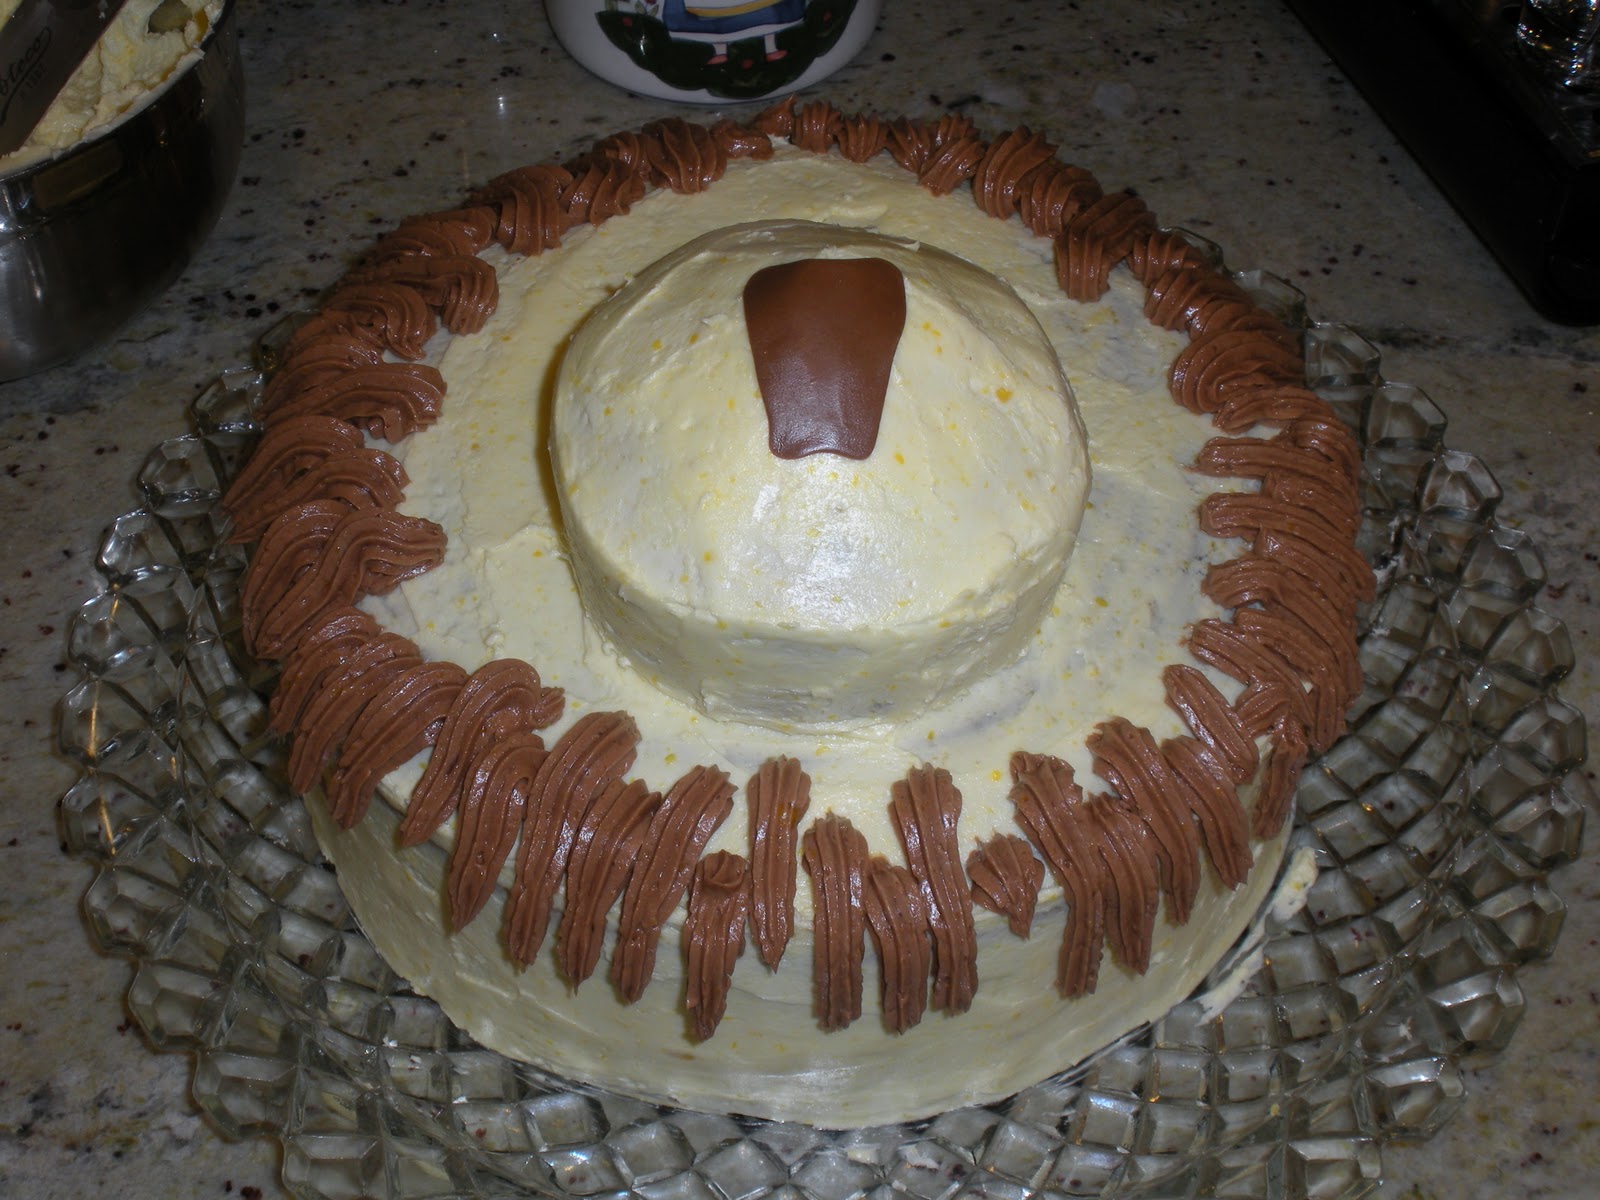 |
| The decorating in process, I added the nose as a guide, but then started with the mane. |
Neoclassic Buttercreamby Rose Levy Beranbaum
6 large egg yolks (3.5 fluid ounces)
3/4 cup sugar
1/2 liquid cup corn syrup
2 cups unsalted butter, softened
2-4 tablespoons liqueur or eau-de-vie of choice
Have ready a greased 1-cup heatproof glass measure near the stove.
In a bowl, beat eggs yolks with electric mixer until ight in color. Meanwhile, combine sugar and corn syrup in a small saucepan and heat, stirring constantly, until sugar dissolves and syrup comes to a rolling boil. [The properties of corn syrup allow for this combination to boil at exactly the soft-ball stage necessary for the right consistency of frosting. There is no need to use a thermometer.] Immediatly transfer syrup to the glass measure to stop the cooking.
Beat the syrup into the yolks in a steady stream. Don't allow the syrup to fall on the beaters or they will spin it onto the sides of the bowl. If using a stand mixer [which I recommend] pour a small amount of syrup over the yolks with mixer off, then beat at high for 5 seconds and repeat, increasing amount of syrup.
Continue beating until completely cool. Gradually beat in the butter, and if desired any optional flavoring. [For the lion cake, I used 2 tablespoons vanilla liqueur, and in the second batch of frosting, 7 ounces of melted bittersweet chocolate.]


Mmmmmmmmm...Now I'm even sorrier I missed it!
ReplyDeleteI did a google search looking for a safari themed for my animal obsessed boys upcoming 2nd birthday. This is SUCH a cute idea and I think this is the one I am going with! Thanks!
ReplyDeleteI'm so glad! Please come back and let us know how it goes!
Delete