Wednesday, June 27, 2012

Fresh Blueberry Scones

With the blueberries leftover from Father's Day, Will let me know that I would be making blueberry muffins. He actually said this was another way for me to avoid pancakes.  I have made a lot of blueberry muffins over the years, but they've always been adapted from other recipes - leaving off the crumb topping or adding berries to a plain recipe. I'm always leary of such practices if I haven't made the original recipe at least once... a truly well-designed recipe will have all the components - toppings, mix-ins, batter - perfectly balanced so that substitutions will impact the base. I didn't have a go-to recipe that I could count on and make changes to with confidence. I offer the following, from the trusted Joy of Cooking, as one such staple. I chose the "Sour Cream Muffin" variety as the base, and stired in 1 1/2 cups fresh blueberries. When adding berries to baked goods, it's good to hold back a tablespoon or two of the dry ingredients before you mix with the wet ingredients (eggs/milk etc) to toss with the berries before stirring them in to the finished batter. This helps them mix in and not sink to the bottom or clump up as much.

Makes 15 standard muffins; can also be baked in loaf or baking pan as coffee cake.
2 cups all-purpose flour
1 tablespoon baking powder
1/2 teaspoon baking soda
1/2 teaspoon salt
1/4 teaspoon grated nutmeg
2 large eggs
1 cup sour cream (or buttermilk or plain yogurt)
2/3 cup sugar (light brown or white)
3 tablespoons melted butter
1 teaspoon vanilla
1 1/2 cups fresh blueberries

Preheat oven to 400. Grease or line muffin cups. Whisk together flour, baking powder, soda (if using; see note below), salt, and nutmeg. 
Separately whisk together remaining ingredients except berries until well-combined. Stir in dry ingredients mixing just until moistened; do not over mix; batter will be clumpy. Stir in bluberries and fill muffin cups 2/3 full.

Bake 17-20 minutes.
Note: you can subsitute milk or cream for the sour cream; if so, omit the baking soda.

I thought these were really really good. And while most muffin recipes say they are best eaten fresh, we found these lasted well for three days (we toast them before eating anyway.) They were cakey and flavorful without being too sweet or dense. But as soon as I took them out of the oven, I commented to Will, "I'm surprised you didn't ask me to make you scones." Naturally, he replied, "Good idea! Will you make me some scones?"

As above with muffins, I didn't have a go-to scone recipe. And while you can of course simply stir some blueberries into your basic scone recipe, but without a standby for comparison, I felt I should find a recipe was specifically designed for fresh blueberries - something that might be more likely to take into account the extra liquid from fresh berries, or the tart and sweetness of fruit. Many of the recipes call for dried fruit which has less impact on the final consistency of the baked good, so I was glad to find this version for Fresh Blueberry Scones at the trusted King Arthur Flour website.


I'd read in another recipe somewhere that leaving the butter bits in "pea-sized" clumps after the initial mixing would give a more flakey texture, while processing the dough until the butter was more evenly distributed with the flour into a sandy texture would provide a more fluffy texture, so that's what I went for.


Saturday, June 23, 2012

Oven Puff Pancake with Bacon-Sauteed Cantaloupe

Have I said before how much Will likes pancakes? He loves them. He wants them every Sunday. (Actually, he eats them twice a week, because one batch makes plenty for 2 breakfasts.) I am not crazy about pancakes, even though when I make them from scratch I do find they are pretty tasty. So every once in a while I try to break the Sunday morning mold and try something different. An oven puff pancake seems like it should still scratch the pancake itch, and from the standpoint of being a honey-delivery device, it does. While Will is incredibly supportive of everything I make, he still asks for his standard pancakes every Sunday morning, but we both scarfed this up as a change.


The only true way to appreciate the [aesthetic, not culinary] beauty of a puff pancake is while it's still in the oven before you've opened the door. The craggy heights the batter reaches are sculpturally magnificent.

Puff Pancake
from The Joy of Cooking
1/2 cup milk
2 large eggs
1/4 teaspoon salt
1/2 cup all-purpose flour
4 tablespoons butter

Set rack in lower third of oven and preheat to 425.
Whisk together milk, eggs, and salt. Stir in flour until smooth. Melt butter in 10" oven-safe skillet, tilting to coat sides of pan.
Pour batter into pan without stirring and bake in oven for 15 minutes. Lower heat to 350 and bake an additional 10-15 minutes until puffed and brown. Serve immediately.
Note: I only used 2 tablespoons butter, and did not feel it was detrimental.

The pancake will collapse almost immediately after coming out of the oven. Be not disappointed! This is what gives you the perfect bowl into which to heap delicious toppings. Fruit, jam, syrup, honey, powdered sugar, or even sauteed vegetables and cheeses are all terrific options. I tried to be more foodie-esque and felt I was successful with diced cantaloupe sauteed in bacon.
Melon-Bacon Pancake Topping
1/2 small ripe cantaloupe melon, peeled, seeded, and cut into 1/2" dice
2 slices fatty bacon
1-2 teaspoons brown sugar

Cook bacon over medium heat until fat is rendered. If desired, remove meat and set aside. Otherwise, discard solids and add diced melon to hot fat. Simmer over medium heat to extract fruit juices. Cook until melon is soft, but not falling apart. Sprinkle with brown sugar and raise heat to medium-high and boil until sauce starts to carmelize. Spoon fruit (with bacon, if using) into center off baked puff pancake and drizzle with juices.


Saturday, June 16, 2012

Lamb Burgers

I don't have a whole lot to say about making these burgers, except that Will was hungry for a burger, and I suggested trying to gourmet-it-up by making lamb burgers with a homemade roasted red pepper spread. My garden grows a good selection of fresh herbs for a mediterranean perk: oregano, mint, and parsley, and I minced some garlic to stir in as well. But the real treat was to top the cooked patties with some crumbled feta cheese, and spread the bun with an aioli. Since the grill was already on, we made a side of some vegetables tossed with kalamata olives to give them a bit of tangy thematic flair.

Burgers
1 pound ground lamb
handful of mixed herbs like mint, oregano, and parsley
1 glove mashed minced garlic

Blend together with a fork or your hands. Form into 4 equally-sized patties. Season with salt and pepper.
Grill, flipping every three minutes, until cooked through (about 8 minutes if meat was brought to room temperature first.)


Veggie mix
diced yellow squash (or zucchini)
onion
carrot
4 chopped olives
toss of olive oil

Seal in a foil packet and grill about 20 minutes. Drizzle with balsamic vinegar before serving.


Roasted Red Pepper Aioli
2 roasted red pepper halves
1-2 tablespoons mayonnaise
cayenne pepper
1 clove garlic
squeeze of lemon wedge

Process in a food processor. Spread on toasted buns, top with lamb patty and crumbled feta, and serve with mixed vegetables.


Wednesday, June 13, 2012

Raspberry Cheesecake Tart

My aunt was diagnosed six years ago with stage II breast cancer, and after surgery and radiation, she has been clear since. Rather than sign-up for a remaining lifetime of aggressive and chronic drugs to keep the cancer at bay (which apparently only have little over 50% success rate) she opted instead to loose weight and try to follow a low-fat diet which has shown to have the same success and preventing recurrence of cancer.

I'm really proud of her and the work she has done to improve her health (though I would probably choose the pills!) So, while I am by no means offering this dessert as low fat, I do try and respect her efforts to eat less and eat healthier. When her birthday rolled around at the beginning of June, rather than load up layers of dense cake with creamy sweet buttercream, I chose this fresh fruit tart instead.

Again, I certainly don't mean to try and pass this off as healthy food, but I do think there is a lot to be said for incorporating some ingredients that do have some nutritional value, even when they are high fat. For example, this crust uses almonds, and the filling uses reduced fat cream cheese (some protein to counter the sugar-buzz), and frankly there's nothing to argue about fresh whole raspberries and apricots. So even though there is plenty of butter and refined sugar, this dessert as a whole still offers some nutritional benefits through fresh fruits and nuts as well as a satisfying mouthfeel that really does allow you to "just have a taste" and feel like you've really enjoyed a delightful dessert without having to over-indulge. Happy 69th Birthday Patty!


For Crust
from Joy of Cooking "Pat-in-Pan Shortbread Dough"
1 1/4 cups all-purpose flour
1/2 cup sugar
1/4 teaspoon salt
2 ounces toasted almonds, cooled and finely ground
1/2 cup (1 stick) butter, chilled
1 large egg yolk

Pulse together first four ingredients in food processor. Cut butter into 1/2" pieces, and sprinkle over flour mixture, then pulse until coarse crumbs form. Add egg yolk and pulse just until dough comes together, then pat into 9" tart pan, pressing up sides. Freeze tart shell while oven preheats.

Preheat oven to 400 degrees. Bake tart shell 18-22 minutes, until golden. Lower oven temperature to 350 and prepare filling.


For Filling
from Gourmet magazine, August 1995
8 ounces cream cheese, softened (I used neufchatel, 1/3 less fat)
1/2 cup sugar
1 teaspoon vanilla
1 large egg, beaten lightly
1 tablespoon all-purpose flour


Blend together all ingredients until smooth. Pour into par-baked tart shell. Bake about 20 minutes at 350 degrees until set.

Cool to room temperature, then chill until fully set - at least four hours or overnight. Top with fresh raspberries. I wash mine, but if you wash them, they can spoil within 24 hours. I also used 1 sliced apricot. Glaze with jam or sugar syrup. I happened to have some leftover rhubarb simple syrup in the freezer which made an excellent glaze for this purpose - not only are rhubarb and raspberry complimentary flavors, but the bright red rhubarb syrup brought out the lovely color in the berries. Use a pastry brush to lightly brush the fruit with the syrup - this will help hold them in place, keep them fresh, and also make them shine like jewels.


This is now a go-to recipe for me. It adapts endlessly well to different nuts, different fillings, and different fruits. Exchange the almonds in the crust for walnuts, pecans, hazelnuts, or even pine nuts. Swap the raspberries and apricots for blueberries, strawberries, plums, peaches, or nectarines. Flavor the cream cheese with lemon or orange zest, coconut extract, rum, or even replace with chocolate ganache.

For Father's Day, I used a walnut crust (which I preferred to the almond, as it's slightly more tender and shortbread cookie-like) filled with lemon cream cheese and topped with blueberries. I replaced the sugar in the cream cheese filling with Splenda for Baking, and while it looked a little plastic-y coming out of the oven, the taste and texture were fine. And for friends the following weekend, I repeated the walnut crust but filled with chocolate ganache and topped with strawberries. Use any complementary jam melted with a teaspoon or two of water or spirits... if you don't have a jam that is the same flavor as the fruit, apricot jam is the traditional stand-in, because it's color is mostly clear and the flavor is just a bit of sweet-tart that doesn't impart too much to confuse the palate.


Frustratingly, I can not find the photo of making the walnut crust with a chocolate ganache filling and topped with strawberries. Probably because it was so delicious that we ate it all before we got a photo.

Saturday, June 9, 2012

Little Boy Birthday Cakes

I'm trying not to set the bar too high for myself. Baking is my hobby and is supposed to be fun and relaxing. But the more I do, the more I want to try, and the more I try, the less I want to repeat because there are so many new things out there to explore. Baking is also one of my few creative outlets, so I want to let myself play around with new ideas and not feel locked into to somethng just because I know it will work. So when a friend asked me to make a cake, I was happy to say yes. But when she first inquired was the day I was scheduled to frost THE wedding cake and I really didn't have much in the way of bandwidth for creative ideas. I was a bit glazed over when she gave me the overview... something to the effect of of her husband's cousin's husband deploying to Afghanistan in a few weeks and their two sons birthdays within a few weeks of each other and the last time the family would all be together so make two cakes please? Two cakes? Can I get through this wedding cake without frosting in my veins and butter on my brain first if you don't mind?? But sure, I can make some birthday cakes.

Kid cakes are both easier and harder. On the one hand, they're easier because kids are less likely to care what the cake actually tastes like. All my birthday cakes growing up, which recall such fond memories of decorating with my grandmother and themes to match my parties, were baked from boxed mix. On the other hand, an artful spray of fresh flowers across a sophisticated swirl of buttercream is not going to bring much "WOW!" factor to a four year old. So this birthday cake assignment actually put the pressure on me to come up with cute and creative ideas that would be fun for little boys without stressing me out.

The themes my friend seeded me with were pretty standard: sports, dinosaurs, cars, Disney. She said the cakes could be the same, although one of the sons doesn't like chocolate. Since my mixer can barely handle a double batch recipe, it's just as easy to mix in two batches, so may as well do two different recipes... I'm sure brothers who are only 11 months apart in age get lumped together frequently enough that they deserve to have unique cakes for their birthdays.

Crumb coat on the car cake.

I started trolling cake websites for design ideas, and I must say, there are a lot of ugly cake pictures out there! Like I said, I didn't want things to get too complicated, but when it comes down to it, drawing a picture of a car on top of a round cake just doesn't do it for me. Birthday cakes and kid parties to me mean shaped cakes. I stuck to my guns in keeping simple designs, but I absolutely had to have some architecture invovled for these guys.

That's how I landed on the two following designs for a "dinosaur" (completely anatomically incorrect) and a car. Each recipe was baked in two 9" rounds, and required only a few cuts, making assembly a breeze. A crumb coat of frosting, and some simple decorating with candy made them super-cute. The hardest part was finding a way to keep them covered until the party... one didn't fit in my fridge at all, so I packed it in ice packes in a box in the basement. And both needed specially-cut platters made from oversized cardboard boxes covered in foil.


The car cake was banana cake from The Cake Bible. No offense, kiddos, but I didn't think you'd appreciate my extra effort to make a special filling; in fact, I didn't even use frosting between the layers, because I was worried it would impact the structural integrity; best to allow the friction of cake-on-cake to help hold the whole thing together.

Banana Cake
3 large ripe bananas (1 1/2 cups)
1/4 cup sour cream
3 large eggs
3 teaspoons grated lemon zest
2 1/4 teaspoons vanilla
3 cups flour
1 1/4 cup + 1 tablespoon sugar
1 1/2 teaspoons baking soda
1 1/8 teaspoon baking powder
3/4 teaspoon salt
15 tablespoons unsalted butter, softened

Line two 9" pans with parchment and butter and flour. Preheat oven to 350. Mash together in food processor or with potato masher (I prefer using a masher) bananas and sour cream. Mix in eggs, zest, and vanilla.
Combine dry ingredients. Add butter, and half of banana mixture, mixing on low until moistened. Increase speed and beat until well mixted, about 2 minutes. Stir in remaining banana mixture in two additions.
Divide batter between prepared pans and bake 30-40 minutes until tester comes out clean. Cool in pans for 15 minutes, then cool on rack completely before assembling.

Stack the two 9" rounds on top of each other. Cut parallel lines leaving a 4" section in the middle to make the chassis. Stack three of the four round edges flat-side down, and trim a diagonal to make the rear window. The curved front makes the windshild. Stack on top of the middle section to make the hood of the car. Frost all over with a crumb coat filling in any gaps with frosting. I used white frosting for this step. Refrigerate until firm.

Cut pieces of parchment paper, wax paper, or foil to make the windshild, rear window, and side windows. Apply over white crumb coat. Frost remaining cake with tinted icing. Using an offset spatula dipped in hot water and dried will help get the smoothest finish. Pipe icing to make rain gutters and doors. I used licorice wheels to for tires, licorice ropes for fenders, rolled gumdrops for license plates (and wrote the birthday boys name on the plates), gumdrops for headlamps and tail lights, and smashed gumdrops cut into shapes for the door handles and side-view mirrors. Ateco tip #133 makes awesome grass, which I scattered with brown rock sugar stones.


Amazingly Simple Buttercream
from Laura Temple
1 1/2 cups of sugar
6 large egg whites 4 cubes of unsalted butter (1 pound) softened to room temperature
3/4 teaspoon real vanilla

Directions:

Put egg whites and sugar in top of double boiler over simmering water. Whisk until temperature reaches 160 degrees. Remove from heat and move to a stand mixer bowl. Whip on medium high until they are room temperature. (Wrap ice packs or bags of frozen vegetables around the base of the bowl to speed cooling).

Once the whites/sugar mixture is at room temperature, keep mixing, and add the butter a couple of tablespoons at a time until all is incorporated. It might looked curdled part-way through, but just keep going and it will come together. Add the vanilla and mix just enough to incorporate it fully. Stir in any optional food coloring. This makes a great stark-white buttercream on its own.

Use immediately, or keep at room temperature and re-beat for a minute before using. If you want to freeze the leftovers, make sure to bring it completely to room temperature before you re-beat or it will curdle.


I think he liked it!
When Will was no doubt the same age as this birthday boy, he had a similar fascination with dinosaurs. He had a stuffed toy named "Dino" which his mom gave to a baker to copy for a cake one year. Naturally, Dino became a sort of inspiration for this dinosaur cake. Fortunately, the simple structure provided by this video: http://www.howdini.com/howdini-video-7073677.html, made it really easy to make the basic outline. But I used my own creativity (as well as copy of the original Dino that Will's mom had made for him after the original deteriorating after years of love and washings) for the decorating, inspired by the bulk candy at my market.
 
The original Dino.
 
The cake recipe was a basic yellow cake from The Cake Bible that I've been wanting to try for a long time; this was the perfect opportunity because the egg whites in the frosting balance the egg yolks in the cake with no leftovers! I thought the flavor of this cake was totally excellent. I didn't line my pans with parchment, because I use removable bottom rounds, and I didn't think it was necessary. However, the cakes completely crumbled apart when I tried to get them out of the pans, so next time I will definitely line the pans with parchment first, and let them cool just a little longer before trying to invert them.
All-Occasion Downy Yellow Butter Cake
from The Cake Bible
6 large egg yolks
1 cup milk
2 1/4 teaspoons vanilla
3 cups flour (300 grams)
1 1/2 cups sugar
1 tablespoon + 1 teasppon baking powder
3/4 teaspoon salt
12 tablespoons softened butter

Preheat oven to 350. Line 2 9" rounds with parchment, then grease and flour.
Combine yolks, 1/4 cup milk, and vanilla.
In large mixing bowl, combine dry ingredients to blend. Add butter and remaining 3/4 cup milk. Mix on low until moistened, then beat on medium speed for 2 minutes. Add in egg mixture in three additions. Divide between pans and bake 25-35 minutes until tester comes out clean. Let cool in pans 15 minutes then invert to cool completely before frosting.
Dino had to be orange (not green) but some of the same cute grass as on the car made a great little field for him to trapse around on, especially accented with some chocolate "rocks." His spines and plates were made from dried mangos, and orange sugar sprinkles gave his skin a leathery speckledness. A gumdrop eye and some sliced gumdrop teeth rounded out his face.

Wednesday, June 6, 2012

best meal of my life

I have been to really nice restaurants before. I have been to very good restaurants before. I have been to expensive restaurants before. But I have not been much into modernist cuisine other than to be proud that the author of the media-sensation eponymous tome lives in my hometown. Nevertheless, since our trips to Europe - not so much because of the great food we ate there, but more because of the eating culture we experienced there - Will and I have been trying to eat "better." By better, we're really just going for more mindful... to consider the sources, quality, artisty, and occasion of a meal can bring significantly more enjoyment to eating.


Vacation - in Europe or in your own backyard - can be a great time to practice this. Putting aside cooking techniques and local ingredients, most of us in the States just have a different way of life than Europeans. Our culture values busy lives and packing as much into a day as possible and does less to make time for lingering over meals and conversations. But kicking back on a trip out of town can help us to put aside the rushing and cramming that leads many of us to take out and frozen pizzas.


That is why when I discovered that one of the top five restaurants in San Francisco (which Travel + Leisure has rated #2 city in the United States for Food & Restaurants) was just minutes from our lodging on the Monterey Penninsula, I decided we needed to make a stop.


The restaurant is called Aubergine in the classy L'Auberge resort in Carmel. The food focuses on the freshest local and seasonal items available, which given the proximity to both pristine seashore and one of the largest agricultural belts in the country, is short on neither seafood nor produce. The most fun for me about restaurants like this is just knowing I can truste the chef in that whatever is served will be the best it can possibly be. Even if I don't like it, I know I am judging the finest specimen available. I didn't have anything I didn't like, but what always surprises me is how unappetizing some of the dishes can sound compared to how delicious they taste.


I continually struggle with some of the basic concepts of "modern" cooking which often seems to do more to play with the food than to prepare it into a meal. When our server described some of the preparations at Aubergine to us, I was concerned by the over-the-top creative sounding efforts being more artwork than edible. Do the hunks of succulent lobster meat with crunchy carmelized peanuts, fresh herbaceous cilantro, and satiny-sweet banana foam really need to be presented until a saran shell of coconut gelee? Have we learned nothing about the pleasures and delights of minimalism from our over-indulgent consumerist society? Isn't enough enough? Can't there be too much of a good thing? Well, the answers are yes, yes, yes, and yes. More is not always better, but what makes Aubergine such a triumph is that the chef brings you right up to the edge of pefection without ever slipping down over the other edge. And when that fleshy pure-white lobster comes out shimmering under it's scalloped-edged crown of transparent coconut flavor, we will delicately divide it into tiny bites so as to stretch each mouthful into an entire evening.


I believe the menu changes every day, and you have the choice of two to three options for each of a four-course meal (plus an optional cheese course), or to order the "chef's spontaneous menu" where only ingredients are presented to you and the chef determines the preparations and combinations on the fly. We ordered from the predetermined list, but the couples at tables around us had the spontaneous menu and I would have been joyous to have a bite of anything that came out of the kitchen.

The fois gras was wrapped in rhubarb gelee like a canneloni, then topped
with pea shoots, scortched fava beans and more rhubarb.


Our five-course meal took over 3 hours. Service was impeccable; knowledgable, friendly, polite, sophisticated, unstuffy, and attentive without being intrusive. They took ample time to explain the ingredients in each dish, as well as how to consume it to greatest enjoyment (ie: when to use the unfamiliar utensil, or how to incorporate an unexpected garnish.) The dining room is small but not cramped, and tasteful without being pretentious. Extra special touches included truffles and madelines following the dessert course, a take-home gift box of lemon pound cake for the next morning's coffee break, and an invitation into the kitchen to meet the chef as we were on the way to gather our coats.

Mini lemon pound cake party favors.


Our meal for the evening, as presented on their menu, was preceded with a shooter of spherisized apple with fennel and st germain, and an amuse-bouche of oyster with citrus foam.

First course:
roulade of foie gras, charred fava bean, rhubarb, shallot
maine lobster, young coconut, roasted banana, cilantro, candied peanut

Second course:
monterey bay abalone, bamboo shoot, umeboshi, sea lettuce, alba mushroom and a facinating garnish of "oyster leaf"
king salmon, asparagus, watercress, smoked roe, marrow

Main course:
roasted pintade (a game bird), salt baked celery root, mustard green, celery leaves
pavé of suckling pig with the most incredible seared exterior and fall-apart braised interior, english peas, black garlic, foie gras vinaigrette

Cheese course:

Californian sheeps milk cheese with herbs
French cow's milk triple creme with prune jelly
French aged raw cow's milk with dates
Californian Point Reyes blue cheese with honey
dried fruit crostini

Dessert course:
strawberries, elderflower, deep-fried angel food cake
abinao (dark chocolate from Africa) truffles, toasted marshmallow ice cream, almond


This was a clear coconut gelee - basically edible plastic wrap atop lobster pieces
and candied peanuts topped with white banana foam and fresh herbs and flowers.

Friday, June 1, 2012

The Wedding Cake

When my dear friend Teresa told me she was engaged, my first question was "Am I invited?" But a few months later when she called and said "I have a question for you..." I knew right away she was going to ask me to make her cake. I was thrilled and honored. I had wanted to offer, but I was worried that whatever I would make would just be a disappointment compared to the art and design that would come from a professional bakery. So the fact that she asked me to participate in such a special way in her special event was truly a privilege.

It was also terrifying. Teresa told me the wedding would be at a private home overlooking the Pacific Ocean on the beautiful Monterey Penninsula in northern California. As soon as I bought our airfare, I started worrying about how I was going to get a wedding cake to California!

A few years ago, I did make a wedding cake in a vacation condo for another friend's wedding. It was quite a feat of planning and execution, using a tiny condo kitchen and burning through a hand-mixer.  I measured all my dry ingredients and home, and carried them in plastic containers. I also carried my baking pans and decorating supplies. But while I took my job very seriously and made the cake as beautiful as I could, it was still just a standard 9-inch layer cake (the bride was serving other desserts, and just wanted a cake for cutting and photos.)

Teresa's wedding would be entirely different. While still "small" on the overall scale of weddings, I knew this project would be my biggest ever. Cake for 40 people - by my calculations (which ended up being completely overblown) - would still mean three layers: 10", 8", and 6". [I wasn't planning that they would want to follow tradition by saving the top layer for their 1-year anniversary, since that would somehow necessitate getting the cake from the wedding in California back to our homes in Seattle, but because I overestimated the amount of cake needed, there was plenty for both eating and saving.] 

After consuming the large bottom layer, this was as far through the middle
layer as we needed to cut... the top layer was completely untouched.


I looked at a lot of different cake charts to determine how much cake I would need, and it is universally accepted that slices of wedding cake are smaller than typical cake slices due to the fact that "they are generally proceeding a large meal." My thought is that they are usually small because they don't taste very good so no one wants to eat more than a ceremonial bite, and since my cakes taste delicious, I better be prepared with more. In any case, I could not find consistent serving counts for various sized layers, so I diagrammed a cutting chart of my own and determined I could get 21 2x2"sqaures from a 10" round, 12 from an 8" round, and 10 wedges from a 6" round which would be 43 pieces total, and some people might not want any.

The slices were far from 2" squares, but still amply satisfying. Will had two pieces.

The next considerations were flavors. Of course this decision would be made by the couple, but I wanted to propose some clever options for them. They met through mutual friends at a beer festival, so I really wanted to incorporate beer into the cakes somehow. While I'm not a huge fan of chocolate cakes for weddings, I have made an awesome chocolate-stout cake in the past that I knew would be perfect for dense, moist slices that were firm but tender. Searching back through my files, I realized I had two recipes for the same name cake; one used cocoa powder and one used melted chocolate. I made a batch of each for our cake-tasting session, and the couple liked both and couldn't decide between them, so we decided to do a layer of each! For the cake topper, we went with a honey ale spice cake which was a good foil off the groom's standard favorite of carrot cake.

I love this photo! Thanks Summer!
I was closing in on the planning stages by determining the all important sizes and flavors. I was confident that the recipes we'd chosen would hold up well in taste, because they are sturdy and bold flavored and the beer in the batter keeps them moist and fresh much longer than other varieties. The scariest thing about a wedding cake is decorating it. And the biggest factor in getting good decorations is having good frosting. And the hardest thing about making a frosting that is easy to work with and holds decorations well is making it taste delicious. Enter White Chocolate Cream Cheese Frosting. This is hands down the best tasting, most attractive, easiest to work with, delightful to decorate with frosting you will ever use and an absolute requirement for wedding cake. I made a quadruple batch, packed it in the biggest rubbermaid containers I could find, put it in the freezer two weeks in advance, and then loaded it into my checked suitcase early on the morning of our flight. By the late afternoon when I was ready to use it to frost the layers, it was almost perfectly defrosted (I dipped the bottom of the containers into hot water to loosen and stirred a few times and it became the exact right consistency.)

Don't forget, if you try this yourself, you can't take the frosting in your carry-on because it is considered a "liquid or gel" and will not pass security!!

Now, the big question was whether I could make the cakes in my home kitchen, or whether I would need to bake them on-site. The bridal party was renting a gorgeous vacation home with a full kitchen, so I would have cooking facilities. But I already had my plane tickets for the day before the wedding, so there really wasn't enough time to get the cakes made, cooled, and frosted after we arrived. Not to mention that I would have to bring my own bulky baking pans, since 10" and 6" rounds are non-standard sizes.  With this decision made, it was clear I would need to make the cakes in advance and freeze them. While embarrassing for me, this is pretty standard practice in many professional bakeries, and when properly handled, a frozen cake is undetectable from a fresh one.

I made each layer the weekend before, and wrapped carefully and thoroughly airtightly in plastic, then sandwiched with cardboard rounds before wrapping again tightly in foil. This way the cakes were protected from air and from crush damage. When it came time to travel, I wrapped the foil layers in plastic bags, then gentle secured in bubblewrap inside a hard-sided "rollaboard" suitcase that I carried on. They too, loaded in the suitcase from the freezer the morning of our flight, were perfectly defrosted by the time I arrived at the kitchen later that afternoon.


The two chocolate stout cake recipes, even made with the same chocolate stout brew, were vastly different in taste and appearance. The darkest one, which was more potent and rich, was made with cocoa powder and sour cream and the bride and groom slightly preferred this variety but thought it might be too strong for some. (Note, by strong it is not heavily 'beer flavored' it's just very rich and dark.) My slight preference was for the lighter version, made with melted chocolate bars and brewed coffee. I found it a little less dense and more chocolatey. To further accentuate the differences between the cake recipes, since they were published with essentially the same name by Bon Appetit, I selected complementary fillings of whipped dark ganache for the base, and mocha buttercream for the middle.


The base round, 10", made with cocoa powder and sour cream.


The center round, 8", made with chocolate bars and coffee.

The base layer recipe was baked in two 10" pans. As I commented the first time I made this cake, one recipe says it makes three 8" rounds, but I found it made four, so a single batch was just the right amount for two 10" rounds. For both cakes I used the Chocolate Stout from Trader Joe's. I purchased a more expensive chocolate stout in case we didn't like the taste of the Trader Joe's one, but we thought it drank just fine. Be sure to try your beers (and wines!) before you bake with them - if you don't like the taste of them plain, you won't like the taste of them in your baked goods either. Filled with Whipped Ganache.
Whipped Ganache Filling
1 cup heavy cream
4 ounces 60% dark chocolate
1/4 teaspoon vanilla
Finally chop chocolate. Heat cream to boiling than pour over chocolate and stir until melted. Refrigerate about two hours. Add vanilla then beat until light. Do not overbeat, or it can become grainy.
I baked the middle layer recipe in two 8" pans. Do not fill above 2/3 full. I used one 3.5-ounce bar of Theo 60% chocolate (instead of 3 ounces of unsweetened.) Filled with mocha buttercream.
Mocha Buttercream
4 egg yolks
1/2 cup sugar
1/3 cup corn syrup
1 1/3 cup softened unsalted butter
3 ounces 60% chocolate (I use Theo), cooled
1 tablespoon instant espresso powder dissolved in 1/2 teaspoon hot water
Beat yolks until light in color. Combine sugar and corn syrup over heat until dissolved and boiling. Transfer immediately to a glass measure to stop the cooking. Beat the syrup into the yolks in a steady stream, without allowin ghte syrup to fall on the beaters (or it will spin onto the sides of the bowl instead of incorporating into the eggs.) Beat in the butter one tablespoon at a time until smooth. Beat in the melted and cooled chocolate, and coffee.
This was a half recipe, and I only needed about half of this amount to fill the 8" cake.
For the top layer honey spice ale cake, I used a recipe originally published in Booze Cakes. It was hard to find a honey brew, so don't get your heart set on this until you know that your beer of choice is available. Big Sky Brewing Company out of Montana makes a seasonal honey ale starting April 1, but due to our Washington State distributor, it wasn't available until mid-May! I got a 6-pack just in time for the wedding, which was lucky because my back-up plan was a $13 bottle of Belgian beer brewed with honey. The Big Sky was just right, but check your local market and time of year before committing to it. I filled this layer with a multi-adjusted custard-cream filling sweetened with honey and reduced honey ale. It took me a lot of messing around and washing of dishes to land on a consistency that would hold-up unfrigerated for a day, so I don't really have a recipe I can recreate here. Basically, I reduced 6 ounces of the beer to a couple of teaspoons and dissolved in a couple tablespoons of honey, then used that to sweeten whipped heavy cream.
The base layer with it's "crumb coat".
All the layers were frosted with White Chocolate Cream Cheese Buttercream from The Cake Bible. I used four times the recipe below, which gave me MUCH more than I needed, but I wasn't taking any chances... if anything went wrong in transport, I was going to need a lot of frosting to cover my mistakes, and I didn't want to get caught short and need to make another batch on the fly. It does get expensive with all the cream cheese and white chocolate, but it freezes really well, and can be softened and chilled multiple times without loosing it's consistency. Before piping, I softened it by warming the container in warm water and stirring until smooth, then chilled in the fridge until it was set. Once it was set, even as it came to room temperature again, it didn't slacken or lose it's form. You definitely want to eat it at room temperature though, or it will be too buttery.

As it's a dark cake, it needs a "crumb coat" - a thin coat of frosting that locks all the crumbs in so they don't get picked up when you frost and ruin a nice smooth look Use softened frosting to make a very thin coating, and don't worry what it looks like or how much cake shows through. Chill it until set, and when you go to frost a second time, the frosting will cover all the dark spots evenly and you won't have any trouble getting a perfectly even finish.
White Chocolate Cream Cheese Buttercream
9 ounces white chocolate (any kind you like the taste of - I prefer Lindt; Ghiradelli and Guittard are also good)
12 ounces softened cream cheese (while I really don't understand why, I've read multiple times that Philadelphia brand is really the only one that will incorporate best in frostings and cheese cakes)
6 ounces softened butter
1 1/2 tablespoons freshly squeeze lemon juice
Melt the chocolate and allow to cool. Beat cream cheese until smooth and creamy. Beat in cooled chocolate, then butter and lemon juice until desired consistency.
Base layer after second coat of frosting - see how smooth a finish
you can get with this icing and when it goes on top of a crumb coat?
Teresa and I both looked at a lot of photos of wedding cakes. Me to get ideas for what I could reasonably execute, and her to determine what she likes. I sent her some photos of what I thought would work, and she shared her preferences for designs that aren't too fussy and rely most heavily on fresh flowers for decorations. She didn't really have a color scheme for the wedding in general, though if anything it was tending toward green to pick up nature themes. The matron of honor wore green, and the bride had a green satin sash on her dress. The groom has an affinity for fiddleheads, and their representation in Maori culture of "new beginnings." They incorporated a fiddlehead into the design of their invitation, their wedding bands, and used fresh fiddleheads in their bouquet, boutonniere, and centerpieces.  For these reasons, I took some of the pressure off my pastry-bag piping skills and went with a simple fiddlehead around the base.

Fiddlehead fern design on base cake.


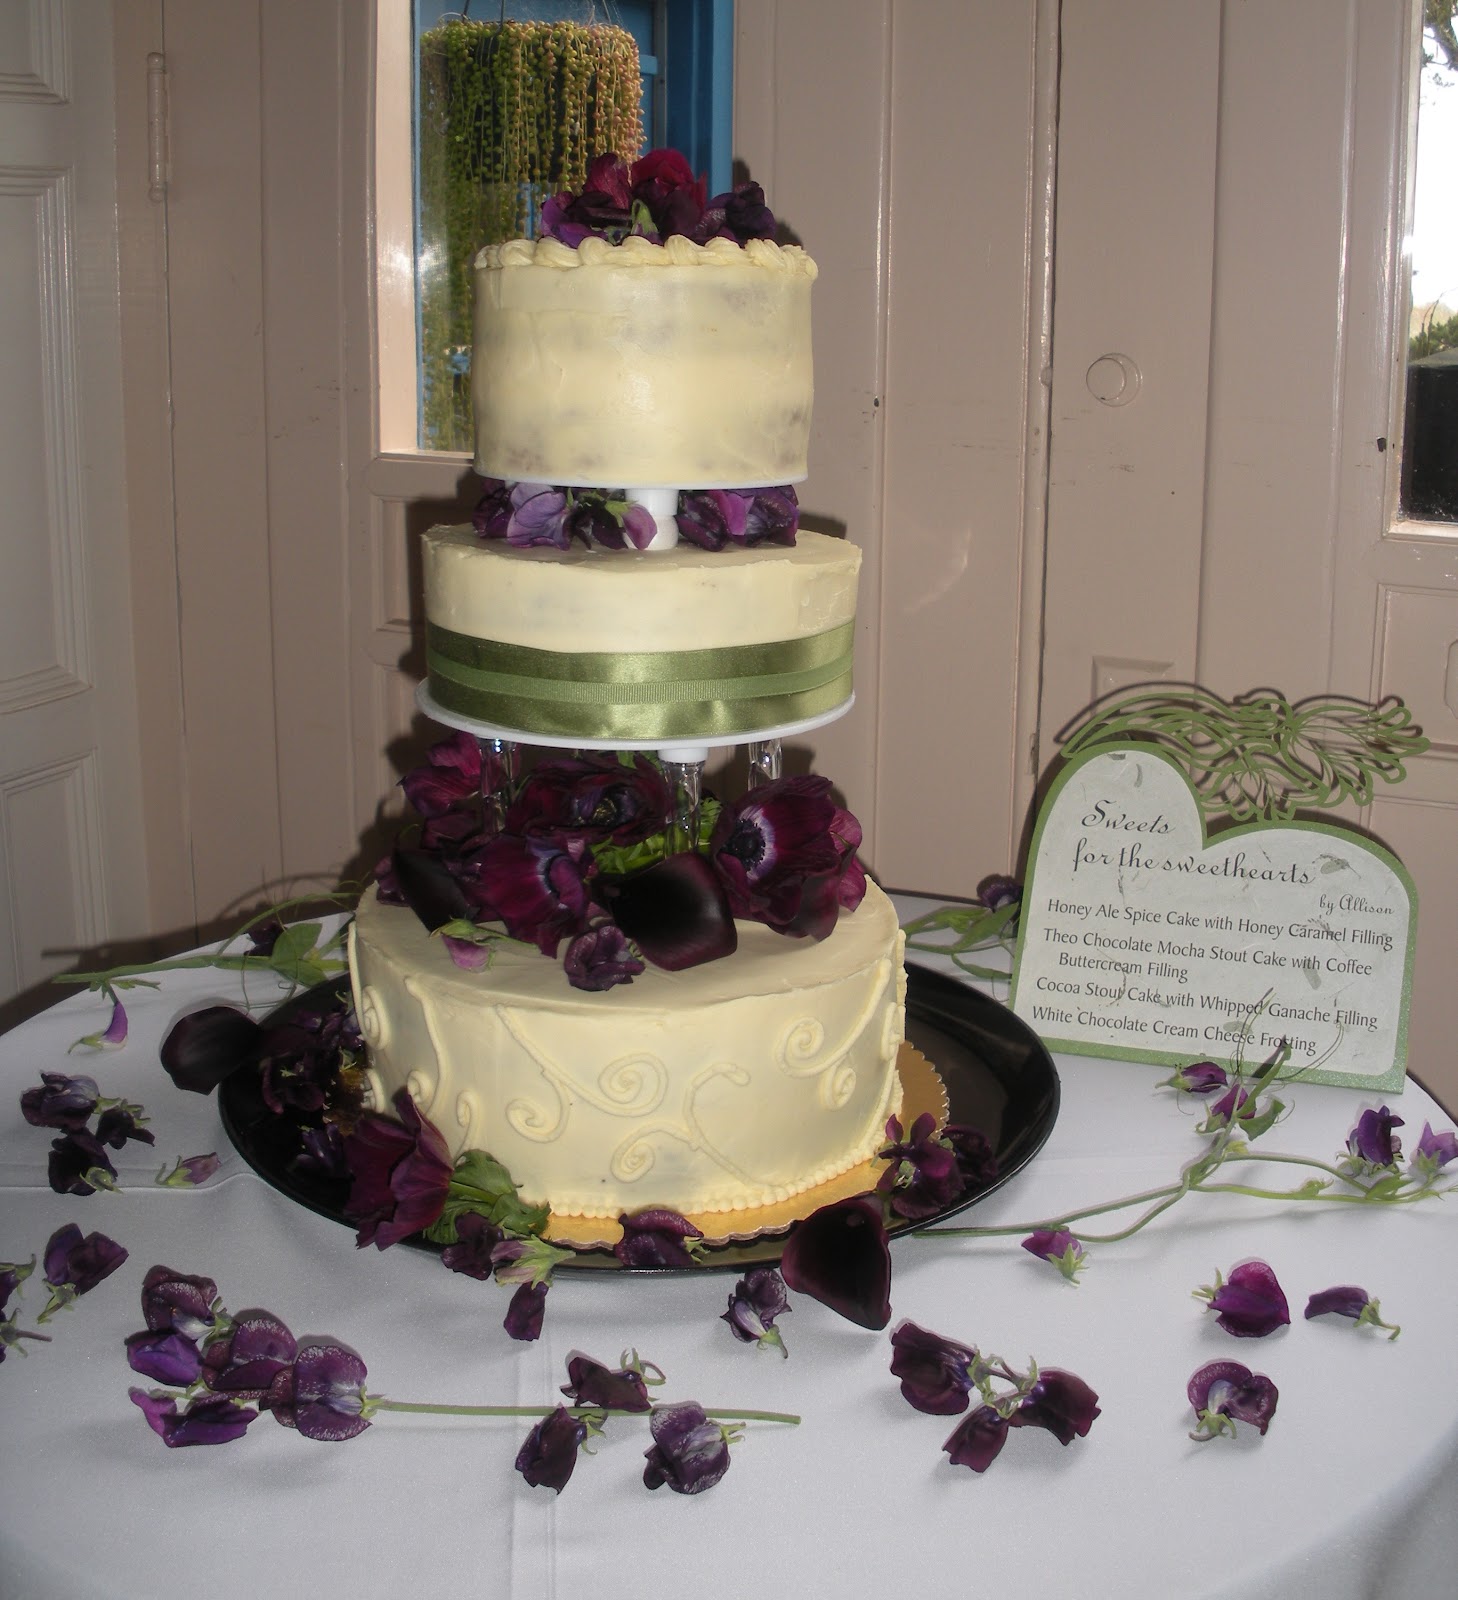
I loved using Wilton's "crystal clear pillar set" - I purchased 4 of the 7" pillars, plus an 8" base and 6" base. They are very easy to use, because they simply press through the base layer, then the plate locks right on to the top of the pillars. It is very secure and simple to disassemble, and it doesn't look cheap (although it was virtually invisible behind all the flowers!) I used the pillars for the 8" layer and stuffed fresh calla lilies, sweet peas, and peonies between. The middle layer was wrapped in a green sash to tie in with the bride and break up the visual of all the frosting.


For the top layer, I'd purchased pearlized white 1" gumballs at the cake store, which gave just enough lift for a few extra flowers without turning the entire construction into a towering monstrosity.