Thursday, December 29, 2011

Christmas Morning Cinnamon Rolls

December always has me baking lots of cookies. This year, I ended up baking a lot of bread as well - I've been reading more bread recipes lately and that makes me want to test and taste. After looking at some dry and smooshed stollen at various grocery stores, I decided to look at making some myself, but after some browsing, I ended up wanting cinnamon rolls instead.


I'm not sure why I ended up using this recipe over others. I have no idea how credible the site is or what other posts are there, but something jumped out at me (probably the proportions of the ingredients that matched what I had in the fridge! and that it was easily scaled down to a breakfast quantity for 2 people!) In any case, as these are puffing in the oven and wafting their spicy cinnamonyness, I think I made a good choice.
Because I had so much other bread around from the week - buttermilk fan-tan rolls, rustic whole wheat French bread, plus cookies, cake, and chocolates, I didn't want a whole huge recipe's worth. I was easily able to scale these quantities back  by dividing by three on the fly. I figured four rolls would be just the right amount (as it turned out, after rising, I was able to slice into 6 good-sized buns when the recipe x3 called for 12).

Instead of raisins, I soaked some dried cranberries in brandy to plump them and give these an extra-Christmasy flair.


Tuesday, December 27, 2011

Christmas Eve Quacker

After the success I had with roast goose for Christmas Eve 2010, Will immediately started campaigning (something typically reserved for the cat and his wet food) for Christmas Eve duck 2011. I literally heard about it every day for the month of November, in preparation. Fortuantely, I can say the build-up was worth it because we were all impressed with how delicious it was. It didn't hurt that it was accompanied by fantastic sweet-and-sour red cabbage and an incredible, spoon-licking prune sauce.

I scoured sources - including Julia Child's Mastering the Art of French Cooking, and my beloved Joy of Cooking - before finally deciding on this recipe. I liked best that the bird itself didn't need much handling - just a blanch and a rinse and into the roaster. The meal is made by roasting at the right temperature to get a crispy skin but keep the flesh moist and then highlight with incredible drizzles and sides.


As called for, I removed a couple small packets of fat from inside the neck cavity, but otherwise didn't see much I could remove before cooking. After pricking the skin (the skin was very slippery and there is a lot of it in relation to the amount of muscle, so this was a difficult task) I poured boiling water over it and the skin shriveled up tightly around the carcass in an amazing and entertaining way. This is to help shrink it. Pricking the skin is to help allow the subcutaenous fat to come out during roasting, which is like self-basting. It spattered quite a bit, so next time I will try to cover it partially somehow with foil to keep my oven less a mess, but still try and let it brown some.


I really can't say enough good things about the cabbage recipe that went with this - stewed in cinnamon and cranberry-pomegranate juice. And the prune sauce is simply divine, while also being incredibly easy, and make-ahead. My mom brought a rich broccoli dish baked in a cream sauce with walnuts. It was delicious and although all these elements were rich, they complimented each other superbly. To mop up the plates (so we didn't have to use our tongues), I baked a rustic whole-wheat French loaf (recipe at the bottom of this post).


For dessert, I made tiny (2 oz) coffee caramel creme brulees and had my first experience with a butane torch. There's no way to replicate in your oven that fantastic sugar crust you can get with a torch. These custards were just the right size, with a punch of sweet coffee flavor but super-creamy smooth texture, to still have room for a couple of homemade cookies and marshmallows.

Date and Tri-Color Swirls cookie recipes here. Marshmallow recipes here.

Rustic French Bread
from the Joy of Cooking

For sponge
1/2 cup water, 80-90 degrees
1/2 teaspoon active dry yeast
3/4 cup all-purpose flour
For bread
2 cups water, 72-75 degrees
3 1/2 cups all-purpose flour
between 1 and 1 1/2 cups whole wheat flour
1 tablespoon salt

Dissolve yeast in water, about 5 minutes. Stir in flour. Stir rapidly about 2 minutes until elastic strands form. Cover tightly with plastic wrap and let rise at room tempearture until triple in volume, about 6 hours (or 14 hours in the fridge, bring to room temperature before continuing).

In the bowl of the stand mixer fitted with dough hook, mix sponge with water and 4 1/2 cups mixed flours. Add salt and continue mixing until the dough cleans the sides of the bowl, adding additional flour if needed. It should feel sticky to the touch but not actually stick to your hands. Knead until it is smooth and elastic. Transfer to an oiled bowl and turn dough to coat. Cover tightly with plastic and let rise until doubled, about 3 hours.

Divide dough in half and shape into a round or a loaf. Place on floured baking sheets. cover and let rise until doubled again, 2-4 hours.

Preheat oven to 450, with a large baking pan in the lower rack. Place baking sheets with dough in center of oven and fill lower pan with boiling water. This helps make a crunchy crust but keeps the center of the loaf soft. Bake 30-40 minutes, until golden and set.


Saturday, December 24, 2011

Seasonal Spiraling and Dizzying Delight

I heard this story about the "perfect Christmas cookie" on the radio back in 2005, and have saved the recipe ever since, but never got around to actually trying it until this year. I was looking for a fun cookie to make as a gift, and these spirals of red, green, and white sugar cookie dough seemed like the perfect choice.


I love how they look, and the texture is impeccable: crisp and melt-in-your-mouth. The dough was fairly easy to work with, and even though after slicing the rounds weren't perfeclty round, as you can see in the photo, they bake to a very even diameter.

I have to admit to being slightly disappointed in the flavor, but that can be easily remedied next time with a bit more extract of vanilla, almond, orange, or lemon zest. They have a nice butteriness, but there wasn't much other flavor dimension as the recipe was written, even with my high-quality clear vanilla from Mexico.

Because I was making these for gifts, and the recipe said it didn't make very many, I made a double batch, splitting the first batch into two and coloring half red and half green. With the second batch, I split it in two for the white, but saved the remainder for another use.

After my disappointment with the flavor, I decided to use the extra dough with a much stronger filling. I have another great Christmas cookie making pinwheels with a date filling. I took about a cup of dates, pureed them in the food processor with a couple tablespoons of brandy and a couple tablespoons of sugar plus two teaspoons of freshly ground anise seeds, then spread that on the extra plain dough and rolled it up. Chill and slice just like the tri-color recipe. The potent booze and spice flavors will mellow when they bake and meld with the butter cookie into a delicious and festive treat.


Monday, December 19, 2011

Let it Snowmallows

I heard this story on the radio about making marshmallows from scratch, and remembered a time at least four years ago when a friend was raving about how easy and delicious homemade marshmallows were. I've never cared about them much one way or the other. While I'll burn through my share at a campfire, those smoldering puffs of gooey burnt sugar are tempered with less flattering manifestations such as Peeps and Nabisco pinwheels.

Even still, the snow-white fluffiness of this confection make for a legitimate holiday baking project, so out came the corn starch and confectioners sugar and on went the apron.

The npr blog does a great job of walking through the recipe step-by-step. My only comments on the process were that I didn't mix the final ingredients "until the bowl is cool to touch" - I whisked about 10-12 minutes, until the texture stopped changing, but the mix was still warm to the touch - probably about 85-90 degrees, and I didn't have any issues with the candy setting up to a nice texture. My only problem was in spreading the mixture evenly in the prepared pan. It's too sticky to spread, and too thick to flow into a smooth layer. So my final marshmallows weren't evenly shaped.

I buy the more expensive clear vanilla from Mexico, because I think it has superior flavor, and is doesn't contribute any unnatural caramel color. That is an especially nice when making something like this where the absolute whiteness is such a hallmark feature.


Otherwise, Will and I both enjoyed these as an interesting change from my Christmas classics, but his exact words were, "It's not a chocolate chip cookie." No, it isn't. It is sweet, fluffy, suprisingly unsticky, but otherwise tasting just of the vanilla flavor from my Mexican extract. We're interested to see if these toast up at all... probably will do a test over the toaster oven...

Wednesday, December 14, 2011

Avocado

For a thoughtful birthday present, some friends bought me Warren Brown's United Cakes of America which includes cake recipes from or representing every state in the country. It's a lot of fun to page through, with some classics, some old fashioneds, and some trendy reinterpretations. The first recipe I was really intrigued to try was his avocado cupcakes.

At first it sounded so unusual, but the more I thought about it, the more I recalled recipes I've heard over the years - especially from other countries that fully appreciate the fruit-not-vegetablness of the avocado - for milkshakes and ice creams. It actually makes perfect sense that avocado could be in ingredient in cake just like applesauce is used to replace oil and bananas are flavorings in bread.


The cupcakes were quite good, especially with cream cheese frosting. But I decided to give them a try as a quick bread as well. Because of the corn meal in particular, it has an appealing nutty texture that is simultaneously dense and moist, and perfect for toast. To make the bread, I followed the recipe exactly, but baked for longer in loaf pans, and skipped the frosting. As personal preference, I mashed (rather than diced) the avocados in both recipes.

Avocado Cupcakes (or loaf), from Warren Brown's 50 Cakes of America
makes 18 cupcakes or two small loafs

7 ounces (1 1/2 cups) all purpose flour
3 tablespoons cornmeal
1/4 teaspoon allspice
1 tablespoon freshly grated nutmeg
1/4 teaspoon salt
1 teaspoon baking soda
1/2 cup buttermilk
1 cup mashed avocado (about 1)
1/2 cup unsalted butter
1 cup sugar
2 eggs
cream cheese frosting (optional)

Preheat oven to 350. Grease pan(s).
Combine dry ingredients and whisk to blend.
Stir baking soda, buttermilk, and avocado together.
Blend butter and sugar on medium speed of stand mixer until fluffer. Add eggs one at a time and beat to blend. Alternately add dry and wet mixtures in 3 additions. Make sure to scrap bowl to incorporate all ingredients from the bottom.
Bake cupcakes 18-24 minutes and loaf 25-35 minutes until golden and skewer inserted in center comes out clean. Cool and frost as desired.


Saturday, December 10, 2011

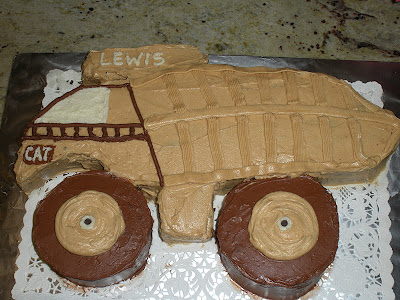
Dump Truck Cake

How honored I was to receive a request from a friend to make the cake for her son's 2nd birthday party! She already had in mind that the cake itself would be chocolate and peanut butter, but otherwise the only direction she cake me was that "the invitations have a truck theme."

There were so many ways to implement a truck and cake, including toy decorations on top, or truck drawings in icing. But my birthday cakes growing up were always "cut-up cakes" that my grandmother and I cut and constructed into an shape that went with whatever other theme my party had. My second birthday, my mom made an alligator cake. I'm not sure what inspired the theme, but we have photos where some of my 20-month old friends did face-plants into the green icing. Great photo memories, but quite a mess at the time!! Once I was about 5, and starting planning the themes myself, they ranged from a rocket for a space theme, Miss Piggy, a witch for a Halloween theme, and a daisy for a garden theme.

It's possible to purchase specific pans for almost any shape you can conceive, and I have received gifts of snowmen and snowflake which are cute and fun to use at the holidays. But these pans expensive (considering they will probably only be used once or twice!) and it's fun to be able to design exactly the shape you want.

Will helped me select just the right kind of truck that a 2-year old would love and also helped break down the photo into basic geometric shapes that would be feasible to carve from cake. From there it was just a matter of lots of delicious frosting to hold everything together!

I was able to cut all the elements from one 9x13" pan.


The finished cake.

Front view, to show dimension.
For the cake, I used my favorite chocolate cake, All-American Chocolate Butter Cake from The Cake Bible. I sliced the layers horizontally and filled with Milk Chocolate Buttercream from the same source, then frosted with Ina Garten's peanut butter frosting. (It took about 1 1/2 recipes worth of peanut butter frosting, plus leftovers of chocolate and some white icing I had for decoration.)

Tuesday, December 6, 2011

Fresh Rambutan in the Yucatan

I'd heard of a rambutan before, and I even knew what it looked like, though I'd never had one previously. I bought these from a street vendor in Puerto Morales, a small village on the beach in Mexico's Yucatan. His sign said muy dulce (very sweet).


He showed me right at his cart how to gently score the exterior with a sharp knife and the insides will literally pop out.


The texture is very similar to a peeled grape. The flavor was more like a lychee - it's mild and sweet with just a hint of citrusy tang.


There is a single pit inside, which comes off easily when the fruit is really ripe (or so I read online; it also sounds like there might be different varieties, and some are 'freestone' while others are not.) The thing I found most interesting in my online research is that these do not ripen after they are picked. They must be picked ripe and then eaten, otherwise they will simply rot, but not get any more ripe. That is probably why we don't find them too often in Seattle! I didn't come across many uses of them besides eating fresh. They were tasty and refreshing and unusual; not amazingly delicious, but completely palatable. Definitely grab a handful to try if you have the opportunity!

Saturday, December 3, 2011

Blue Cheese-Beet Risotto


There are so many talented bloggers "out there" who have way more expensive cameras than I do, are infinitely more patient at explaining step-by-step instructions, and generous with their enthusiasm in the face of any kitchen hardship or mishap. I am not a teacher, I am a critic. I am not an artist, I am an analyzer. I am not creative, I am just opinionated. If you've never made risotto, you should try it. You can test out virtually any variation you'd like, once you understand tha basic formula for the recipe. So, go look it up if you don't have it memorized, but be sure to pick up some of these beets if you find them at your market, because they are unbeetable atop blue-cheese risotto!


Their color is more of a candy-apple red than a beet red, and when I asked the farmer about it, he told me "they taste the same but they're striped inside." I actually have consumed these in restaurants before, but they were thinly sliced on a salad, where their stripes lay in gauzy transparancy over mixed greens. It was a quite a different experience to steam them and eat them whole. They tasted sweeter to me, but the texture was also different. The stripes were not just a color distinction, there was actually a bit of a segmentation, or layering between the colors. Not as pronounced as a membrane, though there was a stringy core that ran through in parts, very similar to the core of a pear. The overall texture seemed softer to me, a bit spongier though when I describe it that way it sounds gross, and they are absolutely delicious. I cut them in quarters in hopes they would cook a little faster, but that ultimately just makes them harder to peel. Instead, simply wash them well, cover with water, and boil 45-60 minutes until a knife can be easily inserted. The skins will slip right off and you can dice or quarter to serve. They disappointinly lost their most vibrant colors after cooking this way, but retained the attractive striped shading. It's possible that roasting would help them maintain some of their vibrancy.

For the risotto, I used a basic traditional recipe, but chopped up the beet greens and stirred them in during the last few minutes of cooking, and substitued blue cheese for parmesan.