Thursday, December 29, 2011

Christmas Morning Cinnamon Rolls

December always has me baking lots of cookies. This year, I ended up baking a lot of bread as well - I've been reading more bread recipes lately and that makes me want to test and taste. After looking at some dry and smooshed stollen at various grocery stores, I decided to look at making some myself, but after some browsing, I ended up wanting cinnamon rolls instead.


I'm not sure why I ended up using this recipe over others. I have no idea how credible the site is or what other posts are there, but something jumped out at me (probably the proportions of the ingredients that matched what I had in the fridge! and that it was easily scaled down to a breakfast quantity for 2 people!) In any case, as these are puffing in the oven and wafting their spicy cinnamonyness, I think I made a good choice.
Because I had so much other bread around from the week - buttermilk fan-tan rolls, rustic whole wheat French bread, plus cookies, cake, and chocolates, I didn't want a whole huge recipe's worth. I was easily able to scale these quantities back  by dividing by three on the fly. I figured four rolls would be just the right amount (as it turned out, after rising, I was able to slice into 6 good-sized buns when the recipe x3 called for 12).

Instead of raisins, I soaked some dried cranberries in brandy to plump them and give these an extra-Christmasy flair.


Tuesday, December 27, 2011

Christmas Eve Quacker

After the success I had with roast goose for Christmas Eve 2010, Will immediately started campaigning (something typically reserved for the cat and his wet food) for Christmas Eve duck 2011. I literally heard about it every day for the month of November, in preparation. Fortuantely, I can say the build-up was worth it because we were all impressed with how delicious it was. It didn't hurt that it was accompanied by fantastic sweet-and-sour red cabbage and an incredible, spoon-licking prune sauce.

I scoured sources - including Julia Child's Mastering the Art of French Cooking, and my beloved Joy of Cooking - before finally deciding on this recipe. I liked best that the bird itself didn't need much handling - just a blanch and a rinse and into the roaster. The meal is made by roasting at the right temperature to get a crispy skin but keep the flesh moist and then highlight with incredible drizzles and sides.


As called for, I removed a couple small packets of fat from inside the neck cavity, but otherwise didn't see much I could remove before cooking. After pricking the skin (the skin was very slippery and there is a lot of it in relation to the amount of muscle, so this was a difficult task) I poured boiling water over it and the skin shriveled up tightly around the carcass in an amazing and entertaining way. This is to help shrink it. Pricking the skin is to help allow the subcutaenous fat to come out during roasting, which is like self-basting. It spattered quite a bit, so next time I will try to cover it partially somehow with foil to keep my oven less a mess, but still try and let it brown some.


I really can't say enough good things about the cabbage recipe that went with this - stewed in cinnamon and cranberry-pomegranate juice. And the prune sauce is simply divine, while also being incredibly easy, and make-ahead. My mom brought a rich broccoli dish baked in a cream sauce with walnuts. It was delicious and although all these elements were rich, they complimented each other superbly. To mop up the plates (so we didn't have to use our tongues), I baked a rustic whole-wheat French loaf (recipe at the bottom of this post).


For dessert, I made tiny (2 oz) coffee caramel creme brulees and had my first experience with a butane torch. There's no way to replicate in your oven that fantastic sugar crust you can get with a torch. These custards were just the right size, with a punch of sweet coffee flavor but super-creamy smooth texture, to still have room for a couple of homemade cookies and marshmallows.

Date and Tri-Color Swirls cookie recipes here. Marshmallow recipes here.

Rustic French Bread
from the Joy of Cooking

For sponge
1/2 cup water, 80-90 degrees
1/2 teaspoon active dry yeast
3/4 cup all-purpose flour
For bread
2 cups water, 72-75 degrees
3 1/2 cups all-purpose flour
between 1 and 1 1/2 cups whole wheat flour
1 tablespoon salt

Dissolve yeast in water, about 5 minutes. Stir in flour. Stir rapidly about 2 minutes until elastic strands form. Cover tightly with plastic wrap and let rise at room tempearture until triple in volume, about 6 hours (or 14 hours in the fridge, bring to room temperature before continuing).

In the bowl of the stand mixer fitted with dough hook, mix sponge with water and 4 1/2 cups mixed flours. Add salt and continue mixing until the dough cleans the sides of the bowl, adding additional flour if needed. It should feel sticky to the touch but not actually stick to your hands. Knead until it is smooth and elastic. Transfer to an oiled bowl and turn dough to coat. Cover tightly with plastic and let rise until doubled, about 3 hours.

Divide dough in half and shape into a round or a loaf. Place on floured baking sheets. cover and let rise until doubled again, 2-4 hours.

Preheat oven to 450, with a large baking pan in the lower rack. Place baking sheets with dough in center of oven and fill lower pan with boiling water. This helps make a crunchy crust but keeps the center of the loaf soft. Bake 30-40 minutes, until golden and set.


Saturday, December 24, 2011

Seasonal Spiraling and Dizzying Delight

I heard this story about the "perfect Christmas cookie" on the radio back in 2005, and have saved the recipe ever since, but never got around to actually trying it until this year. I was looking for a fun cookie to make as a gift, and these spirals of red, green, and white sugar cookie dough seemed like the perfect choice.


I love how they look, and the texture is impeccable: crisp and melt-in-your-mouth. The dough was fairly easy to work with, and even though after slicing the rounds weren't perfeclty round, as you can see in the photo, they bake to a very even diameter.

I have to admit to being slightly disappointed in the flavor, but that can be easily remedied next time with a bit more extract of vanilla, almond, orange, or lemon zest. They have a nice butteriness, but there wasn't much other flavor dimension as the recipe was written, even with my high-quality clear vanilla from Mexico.

Because I was making these for gifts, and the recipe said it didn't make very many, I made a double batch, splitting the first batch into two and coloring half red and half green. With the second batch, I split it in two for the white, but saved the remainder for another use.

After my disappointment with the flavor, I decided to use the extra dough with a much stronger filling. I have another great Christmas cookie making pinwheels with a date filling. I took about a cup of dates, pureed them in the food processor with a couple tablespoons of brandy and a couple tablespoons of sugar plus two teaspoons of freshly ground anise seeds, then spread that on the extra plain dough and rolled it up. Chill and slice just like the tri-color recipe. The potent booze and spice flavors will mellow when they bake and meld with the butter cookie into a delicious and festive treat.


Monday, December 19, 2011

Let it Snowmallows

I heard this story on the radio about making marshmallows from scratch, and remembered a time at least four years ago when a friend was raving about how easy and delicious homemade marshmallows were. I've never cared about them much one way or the other. While I'll burn through my share at a campfire, those smoldering puffs of gooey burnt sugar are tempered with less flattering manifestations such as Peeps and Nabisco pinwheels.

Even still, the snow-white fluffiness of this confection make for a legitimate holiday baking project, so out came the corn starch and confectioners sugar and on went the apron.

The npr blog does a great job of walking through the recipe step-by-step. My only comments on the process were that I didn't mix the final ingredients "until the bowl is cool to touch" - I whisked about 10-12 minutes, until the texture stopped changing, but the mix was still warm to the touch - probably about 85-90 degrees, and I didn't have any issues with the candy setting up to a nice texture. My only problem was in spreading the mixture evenly in the prepared pan. It's too sticky to spread, and too thick to flow into a smooth layer. So my final marshmallows weren't evenly shaped.

I buy the more expensive clear vanilla from Mexico, because I think it has superior flavor, and is doesn't contribute any unnatural caramel color. That is an especially nice when making something like this where the absolute whiteness is such a hallmark feature.


Otherwise, Will and I both enjoyed these as an interesting change from my Christmas classics, but his exact words were, "It's not a chocolate chip cookie." No, it isn't. It is sweet, fluffy, suprisingly unsticky, but otherwise tasting just of the vanilla flavor from my Mexican extract. We're interested to see if these toast up at all... probably will do a test over the toaster oven...

Wednesday, December 14, 2011

Avocado

For a thoughtful birthday present, some friends bought me Warren Brown's United Cakes of America which includes cake recipes from or representing every state in the country. It's a lot of fun to page through, with some classics, some old fashioneds, and some trendy reinterpretations. The first recipe I was really intrigued to try was his avocado cupcakes.

At first it sounded so unusual, but the more I thought about it, the more I recalled recipes I've heard over the years - especially from other countries that fully appreciate the fruit-not-vegetablness of the avocado - for milkshakes and ice creams. It actually makes perfect sense that avocado could be in ingredient in cake just like applesauce is used to replace oil and bananas are flavorings in bread.


The cupcakes were quite good, especially with cream cheese frosting. But I decided to give them a try as a quick bread as well. Because of the corn meal in particular, it has an appealing nutty texture that is simultaneously dense and moist, and perfect for toast. To make the bread, I followed the recipe exactly, but baked for longer in loaf pans, and skipped the frosting. As personal preference, I mashed (rather than diced) the avocados in both recipes.

Avocado Cupcakes (or loaf), from Warren Brown's 50 Cakes of America
makes 18 cupcakes or two small loafs

7 ounces (1 1/2 cups) all purpose flour
3 tablespoons cornmeal
1/4 teaspoon allspice
1 tablespoon freshly grated nutmeg
1/4 teaspoon salt
1 teaspoon baking soda
1/2 cup buttermilk
1 cup mashed avocado (about 1)
1/2 cup unsalted butter
1 cup sugar
2 eggs
cream cheese frosting (optional)

Preheat oven to 350. Grease pan(s).
Combine dry ingredients and whisk to blend.
Stir baking soda, buttermilk, and avocado together.
Blend butter and sugar on medium speed of stand mixer until fluffer. Add eggs one at a time and beat to blend. Alternately add dry and wet mixtures in 3 additions. Make sure to scrap bowl to incorporate all ingredients from the bottom.
Bake cupcakes 18-24 minutes and loaf 25-35 minutes until golden and skewer inserted in center comes out clean. Cool and frost as desired.


Saturday, December 10, 2011

Dump Truck Cake

How honored I was to receive a request from a friend to make the cake for her son's 2nd birthday party! She already had in mind that the cake itself would be chocolate and peanut butter, but otherwise the only direction she cake me was that "the invitations have a truck theme."

There were so many ways to implement a truck and cake, including toy decorations on top, or truck drawings in icing. But my birthday cakes growing up were always "cut-up cakes" that my grandmother and I cut and constructed into an shape that went with whatever other theme my party had. My second birthday, my mom made an alligator cake. I'm not sure what inspired the theme, but we have photos where some of my 20-month old friends did face-plants into the green icing. Great photo memories, but quite a mess at the time!! Once I was about 5, and starting planning the themes myself, they ranged from a rocket for a space theme, Miss Piggy, a witch for a Halloween theme, and a daisy for a garden theme.

It's possible to purchase specific pans for almost any shape you can conceive, and I have received gifts of snowmen and snowflake which are cute and fun to use at the holidays. But these pans expensive (considering they will probably only be used once or twice!) and it's fun to be able to design exactly the shape you want.

Will helped me select just the right kind of truck that a 2-year old would love and also helped break down the photo into basic geometric shapes that would be feasible to carve from cake. From there it was just a matter of lots of delicious frosting to hold everything together!

I was able to cut all the elements from one 9x13" pan.


The finished cake.

Front view, to show dimension.
For the cake, I used my favorite chocolate cake, All-American Chocolate Butter Cake from The Cake Bible. I sliced the layers horizontally and filled with Milk Chocolate Buttercream from the same source, then frosted with Ina Garten's peanut butter frosting. (It took about 1 1/2 recipes worth of peanut butter frosting, plus leftovers of chocolate and some white icing I had for decoration.)

Tuesday, December 6, 2011

Fresh Rambutan in the Yucatan

I'd heard of a rambutan before, and I even knew what it looked like, though I'd never had one previously. I bought these from a street vendor in Puerto Morales, a small village on the beach in Mexico's Yucatan. His sign said muy dulce (very sweet).


He showed me right at his cart how to gently score the exterior with a sharp knife and the insides will literally pop out.


The texture is very similar to a peeled grape. The flavor was more like a lychee - it's mild and sweet with just a hint of citrusy tang.


There is a single pit inside, which comes off easily when the fruit is really ripe (or so I read online; it also sounds like there might be different varieties, and some are 'freestone' while others are not.) The thing I found most interesting in my online research is that these do not ripen after they are picked. They must be picked ripe and then eaten, otherwise they will simply rot, but not get any more ripe. That is probably why we don't find them too often in Seattle! I didn't come across many uses of them besides eating fresh. They were tasty and refreshing and unusual; not amazingly delicious, but completely palatable. Definitely grab a handful to try if you have the opportunity!

Saturday, December 3, 2011

Blue Cheese-Beet Risotto


There are so many talented bloggers "out there" who have way more expensive cameras than I do, are infinitely more patient at explaining step-by-step instructions, and generous with their enthusiasm in the face of any kitchen hardship or mishap. I am not a teacher, I am a critic. I am not an artist, I am an analyzer. I am not creative, I am just opinionated. If you've never made risotto, you should try it. You can test out virtually any variation you'd like, once you understand tha basic formula for the recipe. So, go look it up if you don't have it memorized, but be sure to pick up some of these beets if you find them at your market, because they are unbeetable atop blue-cheese risotto!


Their color is more of a candy-apple red than a beet red, and when I asked the farmer about it, he told me "they taste the same but they're striped inside." I actually have consumed these in restaurants before, but they were thinly sliced on a salad, where their stripes lay in gauzy transparancy over mixed greens. It was a quite a different experience to steam them and eat them whole. They tasted sweeter to me, but the texture was also different. The stripes were not just a color distinction, there was actually a bit of a segmentation, or layering between the colors. Not as pronounced as a membrane, though there was a stringy core that ran through in parts, very similar to the core of a pear. The overall texture seemed softer to me, a bit spongier though when I describe it that way it sounds gross, and they are absolutely delicious. I cut them in quarters in hopes they would cook a little faster, but that ultimately just makes them harder to peel. Instead, simply wash them well, cover with water, and boil 45-60 minutes until a knife can be easily inserted. The skins will slip right off and you can dice or quarter to serve. They disappointinly lost their most vibrant colors after cooking this way, but retained the attractive striped shading. It's possible that roasting would help them maintain some of their vibrancy.

For the risotto, I used a basic traditional recipe, but chopped up the beet greens and stirred them in during the last few minutes of cooking, and substitued blue cheese for parmesan.

Wednesday, November 30, 2011

Chocolate Hazelnut 40th Birthday Cake

"Chocolate and hazelnut" was the response I received from a friend after offering to bake her a special 40th birthday cake. I had recommended she peek through the "Cakes" page of this site and see if she developed any particular requests and she lighted upon the 9-layer chocolate-hazelnut cake I made for Will's birthday last year.


Being as I never like to repeat my cakes exactly, I took it as an opportunity to modify the satsuma cake from a few weeks ago with hazelnuts instead of almonds, and reduce some of the nuts in place of a bit of flour. Although both cakes were very good, I strongly preferred this version with flour... it had a finer texture - not so grainy, and less dense.


The orange-hazelnut layers were sandwiched between chocolate genoise soaked in Frangelico syrup. I used the recipe from The Cake Bible and actually had to make it twice because it overbaked the first time. The second time I watched the time very closely, especially as I was baking in three 8-inch rounds instead of one springform pan. Genoise is intended for the top and bottom "crusts" to be cut off. It can be hard to do that, and then cut into layers evenly, even with a cake slicer. At the same time, baking shallower layers can cause each layer to not bake as evenly, and to be so thin as to leave little behind after trimming. Genoise must be soaked in syrup in order to have any moistness, texture, and really - flavor and sweetness. Although I didn't have a taste of the final assembled cake, I liked the idea of the moist but textural nut cake layered against a moist yet airy genoise. The Frangelico syrup can be replaced by any flavor of your choice, but is an appropriate selection to pair with the nuts in the orange cake.

The remaining recipes also came from The Cake Bible, with whipped ganache between the layers (using about 60% chocolate) and bittersweet ganache (using about 75% chocolate) for the glaze. It's very challenging for me to get a smooth ganache finish down the sides of the cake, though the top gets quite glossy and seamless. If I'd had enough chocolate to make extra whipped ganache, I would frost the sides evenly with that, and then allow the ganache to drizzle over it and drip down the sides without worrying about trying to get a full coverage from the glaze.


I pressed chopped hazelnuts part-way up the sides of the cake around the bottom circumference border, and topped with whole toasted hazelnuts and chocolate shavings.

Sunday, November 27, 2011

Thanksgiving Pies

I always make two pies for Thanksgiving, even though my family is so small and some of us are such tiny eaters that even one pie would likely still leave us with leftovers. One reason was because while I believe pumpkin pie to be an essential component of any Thanksgiving holiday, I am not especially fond of it, and so always wanted a dessert that I could enjoy as much as the rest of the meal. After years of making pumpkin pies for the rest of the family, incorporating various iterations such as caramel drizzles andwalnut streusels and gingersnap crumb crusts, I have finally developed an appreciation for plain old pumpkin pie, and my recipe of choice is from The Joy of Cooking cookbook.

An all-butter crust (as opposed to one mostly of shortening) will shrink. Because I par-baked this one,
I ended up with more of a tart than a pie, but it tasted just as good (or better - butter crusts are
far-superior in flavor, though they may lack some of the flakiness you might be used to
in the shortening crusts). The crust could only hold half of the recipe for the filling though,
so I froze the other half of custard and have another pie coming my way in a few weeks.
But I still wouldn't feel right about celebrating the bounty of the season without contributing a second pie to the feast. This year, I selected a has-it-all meal-in-itself 'Harvest Pie' by Leslie Mackie (owner and founder of Macrina Bakery). Not only is it filled with apples, pears, and cranberries, the crust is made of almonds and sesame seeds for a buttery richness that makes an excellent cookie when baked alone.
The crust was probably my favorite part. It is crunchy and flavorful enough to stand alone as a shortbread type of cookie, and held the decorative crimping in the pie rim throughout baking. But it is also tender enough that it made an excellent pie crust as well. I will definitely make it again.
The pie filling is a wonderful representation of the best this season has to offer. I found it a little too sweet though, and far too juicy. The streusel topping was also delicious, but I had cut back on the sugar and butter, and even still used only half the recipe. The recipe below incorporates all of my preferences from the original as printed in Mackie's cookbook, Macrina Bakery & Cafe Cookbook.


Sesame-Almond Cookie Crust
makes enough for two 9-inch crusts
1 cup whole almonds (+ 2 tablespoons for streusel)
3/4 cup sesame seeds (+2 tablespoons for streusel)
3 cups all-purpose flour
3/4 cup
1/4 teaspoon salt
1 teaspoon cinnamon
1/4 teaspoon lemon zest
2 1/2 sticks (10 ounces total) unsalted butter
3 eggs
1 teaspoon vanilla

Preheat oven to 350 degrees. Spread almonds and sesame seeds on separate baking sheets and toast about 10 minutes (almonds will take about 12). Remove from oven and cool.

Combine cooled almonds and seeds with 1 cup flour in food processor and pulse to a fine grind. Add to stand mixer with remaining flour, sugar, salt, cinnamon and lemon and blend. Using paddle attachment, add butter and mix on low until coarse and crumbly, about 3 minutes.
Whisk together eggs and vanilla and mix into dough just until combined. Divide dough into two pieces, pat into a flat circle and wrap in plastic wrap. Refrigerate at least 2 hours, or up to 3 days (or freeze up to two months).

Once chilled, roll out one circle of dough into 12-inch round, lay into pie plate and crimp edge as desired. Freeze for 30 minutes, then fill with foil and pie weights, and bake at 350 for 25 minutes until golden.

Remove beans and foil and set crust aside to cool.

Note: This is a great video for how to make decorative crusts. I especially love the "wheat" border, because it seems so complicated until you watch how easy it is to make.

Harvest Pie Filling
2 Granny Smith apples
2 bartlett pears
1 cup fresh cranberries
1 1/2 cups sugar, divided
1 tablespoon peeled, grated ginger
1 teaspoon cinnamon
1/2 teaspoon ground nutmeg
1/4 teaspoon ground cloves
1 tablespoon fresh lemon juice
1/3 cup cornstarch

Peel and core apples and pears, and cut into 3/4-inch pieces. Combine in large bowl with 1 cup sugar, cranberries, and lemon juice. Toss well and place into colander. Allow to juices to drain at room temperature for one hour.

In bowl, combine cornstarch, 1/2 cup sugar, and spices, then toss with drained fruit. Pack tightly into cooled crust and top with streusel topping. 

Sesame-Almond Streusel Topping
2 tablespoons toasted whole almonds
2 tablespoons toasted sesame seeds
3 tablespoons chilled unsalted butter
1/2 cup all-purpose flour
1/4 cup rolled oats
3 tablespoons brown sugar
3 tablespoons white sugar

Coarsely chop almonds and cut together with butter, seeds, flour, oats, and sugar using pastry blender or your fingers.

Bake assembled pie at 350 degrees for 90 minutes and cool at least one hour before serving. 

Sunday, November 20, 2011

Satsuma Cake

I bought a carton of satsuma mandarins last week, which is way more than Will and I can eat on our own if for no other reason than we get tired of peeling pith off segments. So when I found this recipe using whole satsumas (ie: not delicately sectioned segments), I was VERY intrigued. The original recipe is attributed to Nigella Lawson, but multiple bloggers have posts about it. I probably wouldn't have tried it based on the Food Network alone, so although that is the original source, I hope you'll visit these links to others whose postings inspired me to give it a try.

http://smittenkitchen.com/2009/01/clementine-cake/
I, too, used a 9" pan, and checked it at 30 minutes, but it wasn't done until about 45 minutes. Even at that point however, the outside edge was a bit dark.

http://www.suziethefoodie.com/recipe-review-nigellas-clementine-cake/
I believed her when she said "leave this cake as is, no icing, no dusting of powdered sugar."


My assessment is that this cake is very good and quite easy. And although it's high-fat, it at least offers some nutrition. It's different from what you might be used to and what you  might expect. And it can handle some various "interpretations." Ultimately, this version was not one I will repeat, though I certainly enjoyed it. I especially enjoyed it in a second round when I replaced half of the ground nuts for all-purpose flour and used hazelnuts in place of almonds. It could also perhaps be enhanced with a bit of spice such as ginger or cinnamon. And an attractive sprinkle of powdered sugar or dollop of sweetened whipped cream isn't going to upset the unique balance that is this cake. 

Update January, 2016: So, I did repeat this cake, because I came to it through completely different means when looking for something to do with meyer lemons. I got sent to this recipe  which struck a chord in my memory... turns out it's exactly the same as Nigella's recipe, so I don't know who came up with it first. But I decided to try it again with the meyer lemons. I used 6. I ground the almonds in my food processor which in the end I think is a little too coarse for my preference and I would have preferred commercially ground almonds or - as I say in my notes above - partial substitution with flour. In any case, the lemon flavor is excellent, and the batter filled an 8" pan and a 6" pan both, which I baked for 40 minutes at 375.

Tuesday, November 15, 2011

Pomegranate Chicken

Yeah, so this sauce is definitely not the most attractive looking color or texture. But the flavor is fantastic, and the consistency - thickened with ground walnuts - is unique and delightful. I served this
pomegranate chicken with rice topped with extra sauce, and these spice-glazed carrots.


Pomegranate Chicken adapted from Joan Nathan’s The New American Cooking as found on npr.org.Serves 3-4
1 cup chopped
2 T olive oil
8 oz walnuts
4 skinless chicken thighs (it is fine to leave in the bone)
1/2 teaspoon salt
2 teapsoons fresh lemon juice
1/4 cup sugar
1 tablespoon ketchup
2 T pomegranate molasses
pinch of saffron
2 cups water

Saute onion in olive oil in a medium pot until light golden brown.
Pulse, not puree, walnuts in a food processor, using a steel blade. The walnuts should have some crunch.
Add the chicken, walnuts, salt, lemon juice, sugar, ketchup, pomegranate juice, saffron and water to the onion. Bring everything to a boil, then reduce the heat and cover the pot loosely. Cook for an hour at a slow and constant simmer, stirring occasionally.

Friday, November 11, 2011

Cardamom Cheesecake with Coconut-Cashew Crust and Tamarind Marble

Cheesecakes are great party cakes. They must be made ahead of time. They serve a lot of people. And they are almost infinitely variable to incorporate virtually any theme. So when I offered to bring dessert to a friend's annual Diwali Party (the Hindu festival of lights), I already knew it would be some kind of cheesecake. The hard part would be matching the standard I had set the previous year with the Mango-Coconut Cheesecake.

I started by brainstorming a list of exotic and tropical ingredients, leaving nothing on the table as far as how it might participate as a dessert. From there, I chose some that seemed most non-traditional and researched how I might use them. Ultimately, what I came up with was a cardamom cheesecake with tamarind swirl and coconut-cashew crust. Tamarind has a sour-citrus flavor with a burnt caramel undertone. It's quite strong, and if you don't know what to expect, it could taste a bit "off" but I found it provided a unique and complimentary tartness to the sweet crust and creamy filling of this dessert.


For crust:
about 6 ounces coconut "shortbread" cookies, enough to make 1 1/2 cups of crumbs
1 cup whole roasted cashews, or about 3/4 cup smaller cashew pieces (I used salted, which will make the crust noticeably salty, but in a way I like, similar to salted caramel)
1/4 cup butter, melted
a couple of drops of coconut extract


Preheat oven to 350. Pulse the cookies and nuts together in the food processor until finely ground crumbs. Add the extract to the melted butter and pour over the crumbs, pulse a couple of times to combine evenly. Press firmly into the bottom and partly up the sides of a 9" springform pan. Bake 12-15 minutes just until golden brown. Reduce oven to 325.


For Filling:
1 1/2 pounds cream cheese, softened
1 cup packed brown sugar
3 eggs
2 1/2 teaspoons ground cardamom
1/2 teaspoon ground allspice
2 teaspoons tamarind paste or puree


Beat together the cream cheese and sugar. Use the paddle attachment of a stand mixer to avoid incorporating too much air from a whisk. If your sugar is lumpy, you might want to press it through a sieve to break up the lumps. Make sure the cheese is soft to get the smoothest possible texture, if there are any lumps when you add the eggs, the lumps will not mix in. This isn't a deal-breaker, but the best cheesecakes are perfectly smooth.


Add the eggs one at a time mixing well to incorporate. Remove about 2/3 cup of batter to a small bowl, and mix cardamom and allspice into remaining batter. Add the tamarind to the small amount of batter and mix well.


Pour the white batter into the prebaked crust. Using a spoon, drop about 6 dollops of the dark batter on top. The pattern doesn't really matter, but make sure the dollops aren't touching on order to get the best marble design. Drag a knife across about 1/2-inch deep to "swirl" the colors. I drag lines about 1 inch apart, and then again at a 90 degree angle.


Bake at 325 for about 75 minutes, until center is still wobbly but set. I did not bake this in a water bath, because I wanted a crisper crust, and the top cracked. If you bake in a water bath (place the cake pan in a larger pan and fill slightly more than half-full with water) the top with not crack but your crust will be a little softer.


The version with the "glaze" and garnishes that covered over the attractive marbled design.


Notes: I tried to make a tamarind glaze to drizzle over the cake, but it didn't work. I used a bottle of Jarritos tamarind soda, reduced to a about 1/4 cup, and stirred in 3 tablespoons of butter. It didn't get syrupy even though the ingredients say it is made with real sugar. I used it anyway on one cake, with additional cashews and coconut flakes for garnish, but then realized it just covered the marble design, so you don't really need any garnishes.

I have always baked my cheesecakes in a water-bath, and rarely experience cracking. This time, I wanted a crunchier crust, and I was baking two cheesecakes at the same time (so there wasn't room in my oven for a water bath!) You can see that the top did crack. It's not unattractive, but I will probably go back to the water-bath method. To do so, wrap the outside of your springform pan in a double layer of foil while it is empty. When you are ready to put it in the oven, place it in a larger baking or roasting pan, then fill the larger pan with water until it reaches half-way up the side of the cake pan. The water helps regulate the temperature during baking so that the cake is unlikely to crack.

Tuesday, November 8, 2011

Spaghetti with Mushroom-Mussel Sauce

This pasta recipe was to use up our leftovers from the Mussels with Tomato-Ouzo Sauce. It was so good, I'd love to make it again. But it really does need to be made with leftovers, because the sauce comes from the broth the mussels make while they cook.

Cook pasta according to package directions. I used whole wheat spaghetti. Drain the mussels from the leftover broth. Remove the mussels from their shells and set aside. Stir a bit of flour into the broth (while it is still cold.) I used about 2 teaspoons - use 1 tablespoon flour for 1 cup of liquid. 

In a small saucepan, heat 1/4 - 1/3 cup cream to simmer. Stir in broth-flour mixture and simmer until thickened. If desired, thin with a bit of chicken broth or pasta cooking water.

Meanwhile, slice about 6 mushrooms. Heat 1 teaspoon oil in a wok-type pan and add mushrooms and mussels. Stir frequently over medium heat until mushrooms release their juices and mussels are heated through. Add drained pasta, and sauce, and stir to coat evenly.


I served this with a side of Romanesco broccoli in browned butter with crispy shallots. If you've never had it before, to me it is indistinguishable from cauliflower in taste, but it is such a gorgeous piece of art in nature. It is math and fractals and geometry. It is little christmas trees bound into a bouquet.

Romanesco Broccoli with Crispy Shallots
serves 4 as a side
1 head romanesco broccoli
2 tablespoons butter
1/4 cup vegetable oil
half a shallot, thinly sliced

Heat the oil in a small saucepan to about 220 degrees. Fry the shallot in the oil (make sure there is enough oil to fully cover all the shallots) until they are crispy and golden, about 6-8 minutes. Drain the shallots on paper towels and discard the remaining oil.

Meanwhile, divide the romanesco into florets. I also chopped the stem and the leaves around the stem. Steam all the pieces together, about 6 minutes.

In a 10" pan, melt the butter over low and cook until the solids separate and start to brown but not burn. Toss romanesco in browned butter and increase heat to medium high, stirring frequently until vegetables start to char slightly, 3-5 minutes. Season with salt and sprinkle with crispy shallots to serve.

Friday, November 4, 2011

Apple Spice Cake

I am starting to feel a bit more like how I imagine an artist thinks... how do I make something new, that hasn't been done before, but that is still good - still respecting what is established and tried-'n-true while creating something special and unique? There are recipes I want to try, but for a special occasion, like a loved-one's birthday, I want to make something that is remarkable that demonstrates an extra amount of thought and preparation. I continue my quest for the perfect brownie and perfect sugar cookie, but even if I found the exact recipe, it wouldn't be what I would make for a celebration.

This struggle came to particular light as I was planning a cake for my mom's birthday. The almost-Halloween timing always pushes me heavily toward pumpkin. I love the moist, spiced cakes that pumpkin provides the base for - pumpkin-buttermilk bundt cake with maple glaze, pumpkin layer cake with apicot filling, pumpkin sheet cake with browned butter icing and carmelized walnuts, or pumpkin-orange loaf cake with pecan swirl and bourbon glaze.

So many delicious choices, but so cliched for a late-October birthday. I turned to another part of the autumn harvest: apples, but tried to glamourize them with an international flair. I made an apple-spice cake recipe in two 9-inch round pans, filled the layers with garam masala custard, and frosted with a sweet caramel. The result was moist, rich with fall spices and the exoticism of India, while delighfully reminescent of a sticky, gooey  caramel apple from the childhood Halloween carnival.


Cake Layers
Two 8" or 9" round pans, lightly greased and floured.
Preheat oven to 350.

1 1/3 cups flour
1 cup brown sugar
1 1/2 teaspoons baking soda
1 teaspoon baking powder
1 teaspoon ground cinnamon
1/2 teaspoon ground cloves
1/2 teaspoon grated nutmeg
1/2 teaspoon ground allspice
1/2 teaspoon salt
1/3 cup unsweetend applesauce
1/3 cup vegetable oil
3 eggs
1 large granny smith apple, peeled and shredded

Whisk together dry ingredients. In a separate small bowl, whisk together applesauce, oil, and eggs. Stir in shredded apple, then add wet ingredients to dry and stir just until incorporated. Divide evenly between prepared pans, smoothing tops.
Bake at 350 for 25-30 minutes until tester comes out clean. Cool on racks.

Note: as always, if you can buy whole spices and grind them yourself, the flavors will be much deeper and more complex. You will appreciate the difference.
Garam Masala Custard
1/2 cup whipping cream
2 tablespoons cornstarch
2 whole eggs
4 egg yolks
1/4 cup butter (unsalted)
3/4 cup brown sugar
1 tablespoon garam masala powder
2 teaspoons maple syrup

Stir cream and cornstarch in medium bowl until cornstarch dissolves. Add eggs and whisk to blend.
In small heavy saucepan, melt butter and brown sugar, stir until sugar dissolves then bring to a boil. Mix in garam masala and maple, then gradually whisk butter into cream mixture. Return to saucepan and whisk continuously over medium-high heat until custard begins to thicken, and mixture reaches 160 degrees. Strain custard into clean bowl, press plastic wrap onto the surface, and chill until set.

Caramel Frosting
2 cups packed brown sugar
1 cup whipping cream 
3 tablespoons butter (unsalted) + 3 tablespoons (optional)
1 teaspoon
Combine in a medium, heavy saucepan and stir over medium heat until sugar is dissolved. Raise heat to medium high and cook, without stirring, until temperature reaches 238-240 degrees (soft-ball stage). Remove from heat and float 3 tablespoons butter on top. Allow to cool to 110 degrees (about 45 minutes). Beat icing with electric mixer until cool, thick, and creamy. Use right away because it will start to set (if you want to make it ahead, warm slightly and rebeat to spreading consistency.)
To assemble the cake, fill layers with the custard and frost with the caramel frosting. I coated my cake with one layer of this glaze, and then beat in an additional 3 tablespoons of butter and frosted with a second layer of the thicker icing. The custard could be used to pipe a message/script decoration. Other attractive garnishes would be whole star anise pods ringing the border, with cinnamon sticks tied in a bundle with a pretty ribbon in the center.

The version of the cake pictured is actually frosted with brown sugar buttercream,
which is great to work with and also complements the cake well.

Saturday, October 29, 2011

Pearfect Parsnip Soup

Parsnips taste like carrots to me - if my eyes were closed when eating them, I'm not sure I could tell the difference, although the texture of a steamed or roasted parsnip is a little more firm and cellular than that of a carrot. Nevertheless, the classic pairing of carrot and ginger is what inspired me to this parsnip soup flavored with ginger, and the addition of pear was simply a whim. But give it a try, it's delicious. I left my very thick, so a small serving is enough as a side dish, but you could thin it out with more broth if you wanted it more soupy.

Pear-Parsnip Soup
Serves 4 as a side
1 large parsnip (about 12 ounces), peeled and cut in 1/2" dice
1 medium firm ripe pear, diced
1/2 cup chopped onion
1 clove garlic, minced
olive oil
3 cups stock
3 coins fresh, peeled ginger (about 1" diameter, 1/2" thick)

Saute the onion in just a glisten of olive oil. Add the garlic once the onion is softened and stir to coat. Stir in the parsnip, ginger, and add the broth. Cover and bring to a boil. Simmer 15 minutes or until parsnip is tender. Stir in the pear and return to a boil, then remove the ginger and puree the entire batch to desired consistency.

Serve garnished with a sprinkling of nutmeg and some pepitas (pumpkin seeds).

Wednesday, October 26, 2011

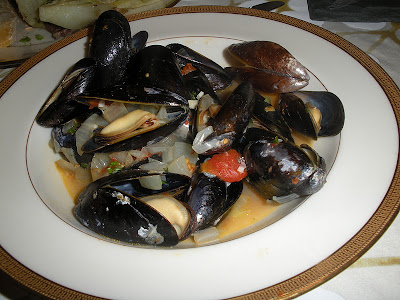
Mussels with Roasted Tomato-Ouzo Broth

It wasn't until I went away to college and stayed with a friend's family in Baltimore that I finally started to enjoy crab. It was then that I eased into crab via crab cakes, bound with breadcrumbs, eggs, vegetables, and dipped in savory sauce. At home, we always ate fresh dungeness crab straight from Puget Sound with little more than a bit of mayonnaise or lemon juice, and as a child, I neither enjoyed nor appreciated such bounty from the sea. After a few good experiences wtih some Old Bay crab cakes as a young adult, I was ready to venture back toward plain crab and could truly savor it.

From there, I crept next toward oysters in my early 20's, which my dad would buy (or, on a good day, dig up himself) when we would vacation at Wescott Bay in the San Juan Islands. He would place them whole and fresh on the barbeque until they steamed open, then pry off the top shell, add a spoonful of cocktail sauce and we'd eat them straight from the grill.
Somehow, I don't remember when, I approached mussels - perhaps because they are similar in shape to oysters. Even as I gradually added these various shellfish to my repetoire of consumables, I hadn't come around to preparing them myself. What spurred me on was a craving for some good artisan bread, and a desire for some tasty, buttery sauce to dip it in. What better way to render a delicious dipping broth than to steam some mussels!

Joy of Cooking, Junior League of Seattle's Simply Classic, and Julia Child's Mastering the Art of French Cooking all have solid recipes for mussels. I found Julia particularly helpful when she said to "set the mussels in a bucket of fresh water for an hour or two so they will disgorge their sand and also lose a bit of their saltiness... Some cooks add flour to the soaking water on the theory thta while the mussles eat the flour and become fatter and more succulent, they are at the same time disgorging their sand more thoroughly." It was good to know I needed to start my recipe a couple of hours in advance to allow time for this step! However, when I asked my fishmonger about it, she had never heard of such a thing (don't worry Julia, I didn't quote my source). She said that our Penn Cove mussels are cultivated on ropes and aren't exposed to hardly any sand, and that soaking in fresh water will suffocate them. She recommended simply leaving them in the fridge under a loose damp towel, which is what I did. I also hadn't realized that the mussels die shortly after being debearded, so even though that is a crucial step in washing and preparing them for cooking, it can't really be done in advance or they will not be fresh. 

Because I wanted to try a step deeper than standard moules a la mariniere (mussels in wine and herbs), and because I also had a pint of grape tomatoes starting toward shriveling, I decided on Bon Appetit's recipe for Mussels with Tomatoes and Anise. It was fantastic and I will absolutely make it again, especially because I was able to make a second gourmet-esque meal from the leftovers (I know - sounds sketchy: leftover mussels? But it was delicious.) I made a few modifications, so my version is below.


Tomato Sauce
3-4 roma tomatoes (I used about 8 ounces grape tomatoes, which were delicious, but a lot of work to peel, which is why I'll try romas next time)
just enough olive oil to coat
1 spring rosemary
two large cloves garlic, tightly wrapped in foil
2 teaspoons balsamic
This only makes 1/2 cup of sauce, which is what the mussels recipe calls for, so I used a 9x5" loaf pan on the convection setting of my toaster oven. Coat the pan lightly with oil, place the rosemary spring in the bottom of the pan. Cut the tomatoes in half lengthwise, and lay cut side down on top of the rosemary. Brush tops of tomatoes with a little more oil. Roast at 400 degrees for 20-25 minutes, until soft, but before juices start to burn or evaporate. Put the foil-wrapped garlic in the oven at the same time - it takes about 25 minutes as well.

Splash the balsamic vinegar in the pan as soon as it comes out of the oven and stir around to loosen any burnt tomato juices. Allow to cool and then pull skins off tomatoes and remove the rosemary spring. Unwrap the garlic from the foil, and the roasted insides should squeeze right out of the peel, or you can cut open the peel and scrape it with a knife to get the flesh out. It should be like a thick paste. Stir the garlic into the tomatoes and mash the sauce all up with a fork.

Mussels
serves 4
1 1/2 cups chopped onion
1 clove garlic, minced
2 tablespoons olive oil
2 pounds mussels in shells
4 anchovie filets, chopped
6 tablespoons ouzo (anise-flavored liquor)
1/2 cup tomato sauce (see recipe above)
1/4 cup white wine
2 tablespoons parsley, chopped
loaf of dense, crusty bread
Saute the onion and garlic in the oil until tender over medium, 6-8 minutes. Add the mussels, tomato sauce, anchovies, and ouzo, stir and bring to a boil. Add parsley and wine, cover, and simmer until mussels open, about 6 minutes. Serve mussels in shells in shallow bowls with broth and bread to soak up the sauce.

It's okay if there are only three of you for dinner - save the mussels (you can take them out of their shells) in their sauce in the fridge and check out my other post for another great recipe using the leftovers.


I thought these were immensely tasty. I'm sure the quality of our local yet esteemed Penn Cove mussels played a part, but I liked the idea of the tomato-anise sauce. The anise flavor was basically undetectable, but I'm certain it contributed significantly to the overall depth of flavor, and it gave me an idea for the side dish. I decided to play on the anise theme and serve baked fennel as the side. My friend brought a delicious mixed greens salad with roasted beets and goat cheese that was a beautiful blend of colors and flavors to accompany our meal.


Baked Fennel
from Lidia's Italy
1 head fennel (12 ounces)
2 tablespoons butter, melted
1 ounce prosciutto, sliced thinly and chopped
1/3 cup parmesan cheese
pepper to taste
Remove and reserve the delicate fronds from the top of the fennel, and cut the bulb into 8 wedges. You can also chop up the stalk into rounds if it is too awkward on the wedges. Add the fennel to boiling water and boil covered for about 12 minutes. Drain and layer into an 8" pan. Drizzle with melted butter, toss with prosciutto and, and sprinkle with cheese and freshly grated pepper. Bake uncovered at 350 for 25 minutes until cheese is bubbling. Garnish with chopped fennel fronds.
Note: this was just enough for three of us, but it was good enough that two of us would happily have consumed it all. I found the original recipe to have too much butter, so the amount is scaled slightly less.