Generally, a news article with "healthy" in the headline isn't going to be at the top of my reading list. But since I've been making some yummy ice creams this summer, I went ahead and clicked through to The Washington Post to read "For healthy homemade ice cream, go bananas" and I'm so glad I did! This experiment with simply blending frozen sliced bananas to create a creamy, sweet "ice cream" is exactly what I imagine it must be like to be a chef at El Bulli or The French Laundry, where pure, uncomplicated, fresh ingredients are transformed into culinary gastronomy by using unusual or unexpected techniques.
This is a smoothy without the milk or ice. How different can it be? When you want a milkshake, are you satisfied with a smoothy? I'm not. But if I want Italian gelato, I fully suspect that this recipe will tickle the appropriate tastebud (minus the glorious Italian Riveria or charming Roman streetscapes of course.)
It's one of those things where you truly have to try it to believe it, because it just doesn't seem possible that simply blending a frozen banana chunk could render a doppleganger for fat-laden calorie-busting ice cream. Will objects to my characterization that this is "as good as" ice cream, but nevertheless, we both consumed our frigid fruit with great satisfaction. (And still had room for dessert!)
Frozen Fruit Gelato
The article says to use a blender. We used an immersion blender which did the trick, but it was helpful to soften the fruit a little bit after taking it out of the freezer. I don't want to push it too hard, because it's intended to be used with a little more liquid, but that would destroy the great texture of the plain pureed fruit.
Start with one banana, sliced, and frozen on a tray so the pieces stay separate. Puree until smooth. Return to freezer briefly if desired, to get it really chilled, but don't let it freeze solid.
Experiment with add-ins. We tried cocoa powder (yum!), mango (yum!). Peanut butter and shaved chocolate are also good ideas, as are berries.
Then I decided to try just plain mango. It was fantastic - I would have believed it was Haagen Daz sorbet. It was just a little more difficult to blend. I'm sure strawberries or peaches would similarly come out like a sorbet. Try extract flavorings like almond or coconut or rum. This is a summer staple!

Thursday, August 30, 2012
Sunday, August 26, 2012
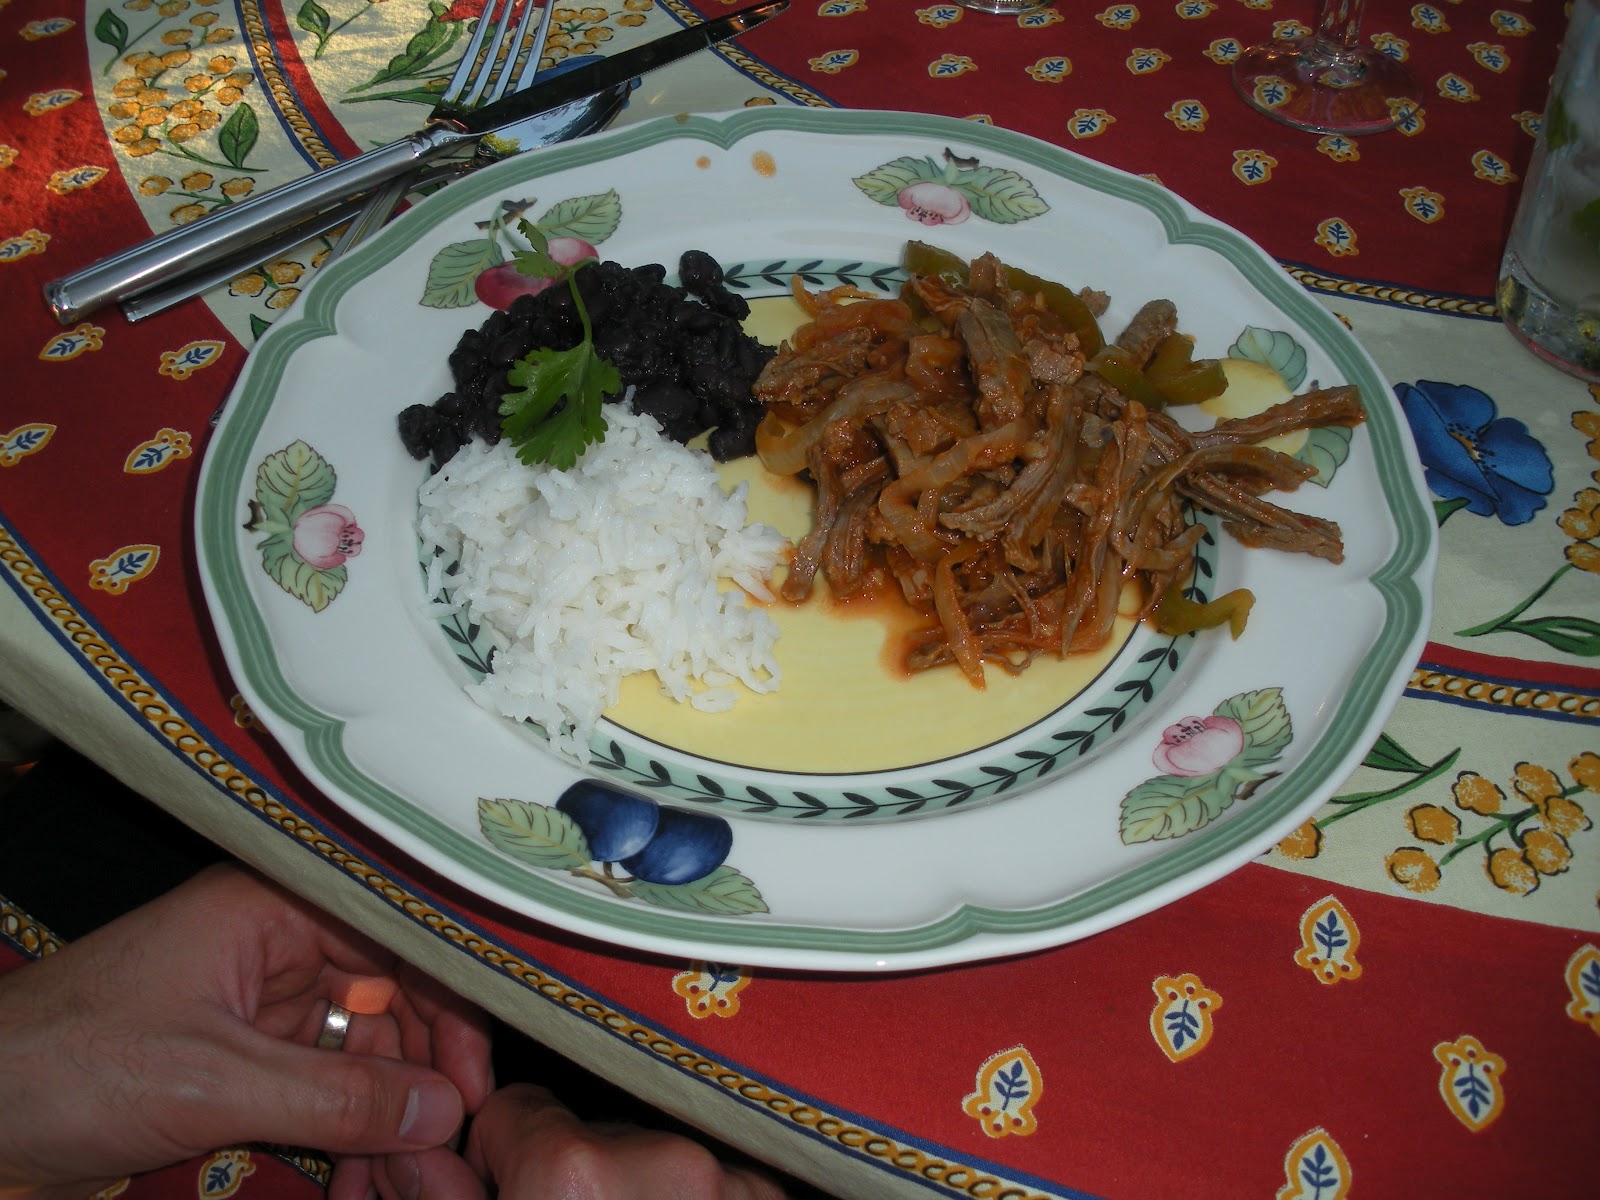
Cuban-Themed Dinner Party
I've never been to Cuba but I hope some day I will be able to visit. In the meantime, I have been inspired more than once to theme dinner party menus around Cuban foods, recipes, and flavors. For a Saturday back-yard picnic, ropa vieja and christians y mores made perfect low-heat (ie: stove top only!) make-ahead party dishes that are super satisfying and incredibly tasty. Both these recipes taste better when cooked the day before so the flavors can meld in the fridge, so it's really quick to heat up while you visit with your guests. It's also perfect for casual entertaining because it's colorful and well-balanced without needing a lot of artful plating or fancy garnishes.
The first time I wanted to try cooking Cuban from scratch was for Will's 30th birthday party. Fortunately, I knew a Cuban through work who was willing to share with me her family's recipe for black beans. She also loaned me her favorite cookbook, Memories of a Cuban Kitchen by Mary Urrutia Randelman and Joan Schwartz. The cookbook gets great reviews on Amazon, so along with the trusted personal recommendation, I believe it is a solid foundation for recipes for Cuban staples.
Ropa Vieja (translation: "old clothes")
from Memories of a Cuban Kitchen
2.5 pounds flank steak
2 bay leaves
1/4 cup olive oil
1 large onion, sliced
1 green bell pepper, sliced
2 -3 cloves garlic, finely chopped
1 14-ounces can crushed tomatoes
1/2 cup sherry
Place beef and 1 bay leaf in large saucepan, cover with salted water, and cook over low heat, covered, until meat is tender, 60-90 minutes. Remove meat from stock, allow to cool, then cut into 2-inch chunks.
In a large skillet (I used a stockpot) heat oil over low until shimmering, then stir in onions, bell pepper, and garlic. Cook until onions are tender, about 8 minutes. Add tomatoes, sherry, and remaining bay. Cook uncovered 15 minutes.
When meat is cool, shred it with your fingers, add to tomato mixture, cover and simmer on low heat for 30 minutes. Remove bay leaves and season with salt and pepper. Dish is best if prepared a day in advance, chilled, and reheated.
Cuban Black Beans
from Teresa Alonso Thompson
1 pound dried black beans
1 teaspoon baking soda
1 green bell pepper
1 large yellow onion
2 tablespoons sugar
1 teaspoon oregano
2 teaspoons salt
1 large bay leaf
dash of pepper
3-4 cloves garlic, minced
3/4 teaspoon cumin
1 tablespoon olive oil
1 tablespoon apple cider vinegar
Soak beans overnight, in baking soda and cool water that covers the beans by 1 inch.
In a blender, puree bell pepper and onion.
Drain soaked beans, and combine in large pot or slow cooker with puree. Add remaining ingredients except vinegar and bring to simmer. Cook three hours, adding additional water if needed to achieve desired consistency. Stir in vinegar. If possible, make a day in advance, and chill, then reheat before serving.
I prefaced this with a salad of avocado and mango in a lime vinaigrette that was so simple but so delicious. I can't believe I didn't get a photo, because the contrasting colors are lovely.
Beat the Heat Salad
serve 4
1 large mango, sliced
1 avocado, sliced
[red onion, sliced - I skipped these]
Arrange on a platter and drizzle with dressing to serve.
Dressing
1 part fresh squeezed lime juice
1 part olive oil
salt and pepper
1 clove garlic, thinly sliced
Place sliced garlic in a glass jar. Cover with lime and oil, season with salt and pepper, and shake well. Allow to rest so garlic infuses dressing. Drizzle luquid over salad, leaving garlic in the jar.
This is a cookie recipe from the beloved and heralded Memories of a Cuban Kitchen cookbook by Mary Urrutia Randelman and Joan Schwartz. I love lime and you don't find it all that often in cookies so this recipe always stood out for me. When I mixed up a batch for my Cuban-themed dinner party, I realized that I had made them once before and been disappointed with both the flavor and the texture. (As printed, they are extraordinarily crumbly, and impossible to shape into attractive cookies. I ended up squeezing balls of dough together in my fist and plopping them on the cookie sheet. The flavor from the lime zest had a bit of acid bitterness rather than a fresh citrus, and the shortening instead of butter is just a taste I'm not as used to.)

So this time I made some modifications to create a moister dough that I could shape into balls. I baked a few, but they didn't really spread, and turned out more like a biscuit than a cookie, so for the remainder, I flattened the balls with the bottom fo a glass dipped in sugar. The result was a crisper cookie that was still a bit too dense for my tastes, but at least held together and spread essense of lime. I served them with pistachio ice cream, which has nothing to do with Cuba, but was a special request of one of our guests.
Torticas de Moron - Cuban Lime Cookies
makes about 40
1/2 cup sugar
2 cups flour
1/2 teaspoon salt
1/2 teaspoon baking powder
1/2 cup shortening
1 teaspoon lime zest
2 tablespoon rum
1 tablespoon lime juice
1 egg
Blend together dry ingredients. Cut in shortening. Add rum, lime zest and juice, and egg and stir until combined. Roll into balls about 1-inch diameter then flatten with the bottom of a glass dipped in sugar. Bake at 350 for 12-14 minutes until golden. Cool on racks.

Wednesday, August 22, 2012
Caramel Cake with Chocolate-Sour Cream Frosting
Remember the friend I talked about a few posts back for whom I've made so many cakes? Well, a close mutual friend of ours has experienced a couple of these cakes, but mostly has been living far away out of state while her husband completes his fellowship. He has finally secured his permanent appointment at the University of Michigan, and while they are still going to be living far from Seattle, it is great that they at last know where they will be, and they are also moving one time zone closer than they were previously. Between moves, they stopped in to Seattle for visits to the grandparents, so I had the chance to make her a cake which she was kind enough to share with me.
I deliberately didn't take a picture of the whole cake, because my decorating was so disappointing, but you can see acceptable-looking glimpses in the slice pictured below. The more astute of you might recognize the Michigan colors which I replicated in a cake-sized "M" like their logo. My problem was using a blue frosting for the background which had separated in the heat (I know - a 93 day in Seattle!) and I didn't have time to cool it and rebeat it so I used it anyway, even though I should have just skipped it.

Unauthorized logo replication aside, the cake was quite tasty, and I especially appreciated what nice slices it made. I used the caramel cake recipe from America's Test Kitchen, which is really only a caramel cake because of the brown sugar frosting - which I skipped in favor of chocolate sour cream. But because these layers were designed to be frosted with with a thick and sweet frosting, and needs a cake that is firm and dense to "hold-up" to it, it was still a great choice to pair with chocolate. It is a very good, and relatively easy yellow cake recipe that can be well-adapted to multiple rich and strongly charactered toppings.
Caramel Cake
from America’s Test Kitchen
2 ¼ cups all purpose flour
1 ½ tsp baking powder
½ t baking soda
¾ t salt
1 ½ cups sugar
4 eggs
2 tp vanilla
½ cup buttermilk
16 T unsalted butter cut into pieces, softened
Preheat oven to 350. Blend dry ingredients. Whisk wet ingredients. Drop butter into flour mixture until pea sized pieces form. Add half egg mixture, and mix to get rid of lumps, then add remaining half of egg mixture and blend about 15 seconds (trying to not add too much air, but to build structure – adding butter to flour is called “reverse creaming” technique as opposed to whipping butter and sugar, then adding flour to creamed butter.)
Grease and flour and line 2 9” pans with parchment. Bake until toothpick comes out clean, 20-25 minutes. Cool completely.
The frosting received positive comments all around - I know the Wilton chocolate buttercream that Will and I love (because of that crackly crisco crust it gets) is too sweet for most of our friends and too unsophisticated for me to be proud of serving, while ganache was too rich and too elegant for a outdoor deck gathering. This sour cream chocolate frosting was just the right balance of chocolatey and sweet. Somehow it just wasn't my favorite, even though it was very stable, easy to work with and pipe, and had a nice smooth, shiny finish. I think it was just a little too creamy tasting! It had a bit of a slick mouth feel when perhaps I would have prefered something stickier. Nevertheless, I think it's just the right thing for some occasions, and this recipe is worth repeating. It would have been fine between the layers, but I did make a whipped ganache filling instead, with 1/2 cup whipping cream, 2 ounces bittersweet chocolate, and 1/4 teaspoon vanilla.
Chocolate Sour Cream Frosting
from Bon Appetit
8 ounces high-quality milk chocolate, chopped
1/4 cup (1/2 stick) unsalted butter, room temperature
2/3 cup sour cream
4 teaspoons light corn syrup
Place chocolate in large metal bowl. Set bowl over saucepan of simmering water and stir until melted and smooth. Remove bowl from over water. Add butter and stir until melted, then add sour cream and corn syrup and whisk until smooth. Let frosting stand at room temperature until thick enough to spread, about 20 minutes.
Saturday, August 18, 2012
Grilled Pizza with Carrot Sauce and Vegetables
A colleague from work has a pizza oven in her backyard that her husband built. They have an annual tradition of celebrating the end of the school year with a pizza party, and I was lucky enough to participate this year. It wasn't quite the same as sitting down in Roma for some wood-fired pizza like we did last summer, but it was an awesome treat that Will and I both were day-dreaming about for days following.
I have made pizza crust before, but even given the immeasurable improvements of a wood-fired crust over a baked one, her recipe was really far superior to anything I'd mixed up previously. She was able to dictate the recipe to me from memory, and even after only making it once, I think I pretty much am able to as well, because it really is that easy.
I have made pizza crust before, but even given the immeasurable improvements of a wood-fired crust over a baked one, her recipe was really far superior to anything I'd mixed up previously. She was able to dictate the recipe to me from memory, and even after only making it once, I think I pretty much am able to as well, because it really is that easy.
3 1/2 cups all-purpose flour (you can replace up to 1 cup with whole wheat flour if you want)
1 teaspoon yeast
1 teaspoon salt
1 teaspoon sugar
1 cup water
1/4 cup olive oil
Mix together water and oil. Blend together dry ingredients, then knead in wet ingredients (I use the dough hook of my stand mixer.) Allow to rise, about 2-4 hours (put in fridge if you're not going to use it until later.)
Punch down dough. Divide in half - and spread each half into a 12-inch round using floured hands on a floured pizza peel or cookie sheet. Top with sauce and desired toppings. Place oven preheated to 475 and cook until crust is golden and cheese is bubbling - 5-8 minutes.
 |
| Don't copy this image, because we assembled our first pizza on an un-floured cookie sheet... be sure to coat the sheet with flour or corn meal first! |
When a hot, hot day finally struck Seattle, I decided it was a perfect chance to try out her pizza on our backyard grill. To put my own twist on it, and attempt to justify some of the guilt for massive amounts of cheese, I made a carrot-based pizza sauce rather than tomato. It was completely delicious and other than being totally untraditional, I'm surprised I haven't seen it before. Of course, tomatoes are packed with nutrition of their own, but carrots bring their own vitamins to the mix, or make a great combination with some tomato paste in the sauce or fresh tomato toppings.
 |
| The carrot sauce even looks just like tomato! |
4 carrots, sliced
chicken broth just to cover
1 large clove garlic, sliced
1 sprig rosemary
1 tablespoon tomato paste
salt and pepper to taste
Simmer carrots until soft. Remove rosemary and puree mixture until smooth.

The cookie sheet can go straight into the oven, or you can try to transfer the pizza to a preheated baking stone (best to use a pizza peel for that though). Because we were grilling ours, I placed a baking stone on the grill first for a bit of insulation from the flames. My cookie sheets seemed to warp, but the returned to their original shape after cooling.
We topped ours with carrot puree sauce, then sliced peppers (poblano and red bell), sliced mushrooms, whole basil leaves (lots!), and a mix of grana padano and mozzerella cheeses.

Wednesday, August 15, 2012
Peach Chiffon Cake
The success of the Peachsauce Cake left me both confident about making cake with fresh peaches and ready to curious about alternative techniques. The dense, nutmeg-spiced cake held up perfectly under frosting and sliced into perfect birthday-cake shaped wedges; it was delicious, and exactly what I'd hoped it would be. But the fragrant sweetness and tangy juiciness of fresh peaches warrant a lighter, more delicate cake; one with crumbs that you lick from your fingers the way you lick the salty sea spray from your lips after a day at the beach.
I have long loved Chiffon cakes. If you don't know what they are, google it as many others will have more interesting, more historically-informed, and more scientifically-explanatory descriptions. But to me, a chiffon cake is the perfect party cake. It's a light and airy sponge cake with the texture of an angel food cake but without the straight-up sticky sugaryness that so many people dislike about angel food. Unlike sponge cake, chiffon cake uses a perfectly balanced batter that needs no soaking syrup. And unlike layer cakes, chiffon cakes don't need any frosting, but are lovely with a simple glaze or any manner of accompaniments from a dollop of whipped cream to fresh fruit to ice cream.
Almost every recipe you will find for a chiffon cake has the exact same proportion of ingredients, so there's not much experimenting or "interpreting" to do. But where I found room for innovation was in the fact that the recipe calls for a significant amount of liquid. I decided I could swap that out directly for my fresh peach puree, and the only other adjustment was to cut back the sugar by 2 tablespoons.
The results were fantastic. While I went into the recipe with bravura, after I mixed the batter and transferred the pan to the oven, doubt sank in. Would the peach puree be too heavy to allow the cake to properly rise? Would the fruit lend a delightful peachiness to the cake, or give it an oxidized doughiness? Would it bake through evenly? The peachification of the chiffon cake could not have gone better. The cake retained its signature height and airy texture, but gained a delightful fruity flavor without becoming overly sweet. For a bit of extra peach, I made a basic glaze of powdered sugar and peach schnapps, but I don't think it was necessary. A dusting of powdered sugar was absolutely lovely, but even after cooling overnight, the cake was still so moist that it completely absorbed the dusting even before I could take a photo, let alone transport and serve it. So I decorated it instead with a spiral of apricot wedges on top. Honestly, guests at the beach party I took it to were so excited to see a freshly baked cake that they couldn't care less what it looked like and practically ripped off chunks with their hands (even though it sliced beautifully).

Peach Chiffon Cake
serves 12-14
2/14 cups (8 ounces) sifted flour
1 1/2 cups sugar
2 teaspoons baking powder
1/2 teaspoon salt
1/2 cup vegetable oil
1/2 cup egg yolks (between 5-7)
1 1/4 cups egg whites (between 7-10)
3/4 cup peach puree
1/2 teaspoon vanilla
1 1/4 teaspoons cream of tartar
Preheat oven to 325.
Combine flour, all but 2 tablespoons of sugar, baking powder, and salt. Make a well in the center and add the oil, egg yolks, peach puree, and vanilla and beat until smooth.
In another large bowl, beat the egg whites until frothy, then add the cream of tartar and beat until soft peaks form. Add the remaining 2 T sugar and beat until stiff peaks form. Gently fold whites into batter with a whisk until just blended.
Pour into ungreased tube pan and bake 55-65 minutes until tester comes out clean. Invert pan and cool upside-down until completely cool.
Friday, August 10, 2012
Chicken-Apricot Curry with Potatoes
Summer produce, still very much in season, spilling out of my fruit bowl and produce drawer in my fridge, implored me to make it the star of a weeknight entree. But a cool, overcast and sunless day culminating in an after-work stop at the grocery store followed by waiting in traffic through multiple cycles of the same traffic light superimposed over a general mid-summer slump with respect to grilling and gourmet salads steered me to my skillet. With onions, ginger, garlic, and yellow curry powder, a load of diced apricots cooked into a bright, tangy sauce for chicken thighs and yukon potatoes.
Not necessarily the most compatible side, green beans sauteed in browned butter with lemon and parsley made for a tasty and attractive visual complement.

Chicken-Apricot Curry
serves 4
2 teaspoons olive oil
1/2 large yellow onion, sliced
1-2 teaspoons grated fresh ginger
1 large clove garlic, minced
1 tablespoon minced fresh jalapeno pepper (or to taste)
2 teaspoons of your favorite curry powder
1/2 cup chicken stock
3 ripe apricots, diced
1 1/2 pounds boneless, skinless chicken thighs (or breasts)
1 pound yukon gold potatoes, diced
1/2 cup fresh cilantro, chopped
Heat oil over medium heat in large skillet until shimmering. Add onion and stir until softened but not browned. Stir in ginger, garlic, and jalapeno. Stir in curry powder until well coated. Stir in 1/4 cup broth to release anything stuck to the pan. Stir in chopped apricots and rest of broth. Bring to simmer and stir in potatoes. Cover and cook until potatoes can be pierced with a fork, adding more broth if necessary - about 10 minutes. Lay chicken pieces in bottom of pay and cover with some of the sauce. Cook until chicken is cooked all the way through and sauce is thickened. Serve topped with fresh cilantro.
Parsley-Lemon Green Beans
Heat one tablespoon butter in small saute pan until brown but not burning. Stir in 20 green beans, trimmed and cut into 1-inch pieces. Cook over medium heat about 5 minutes. Squirt with fresh lemon juice and season with salt. Stir in chopped parsley until heated through and serve.
Monday, August 6, 2012
Apricot Cornmeal Cookies
You know you have a great recipe when you not only make it over and over as written, but also use it as a base for adaptation and experimentation. That's how I feel about a delightful cornmeal drop cookie, which I've previously blogged about here. In that post, I was swapping in some of my own flavor variations by substituting apricots for brandy-soaked dates and replacing sage with anise seed. But I went back to the original to make a platter for a meeting at work. It was predicted to be a hot day, and I'd ordered crisp, chilled chef salads from the caterers, so just wanted a little bite of something light to finish off our lunch.
Apricots - even dried - bring a bright punch of summer sweet-n-sour but sage has an overwhelmingly fall-thanksgiving-turkey connotation for me. This time, I didn't bother trying to replace the sage, and just left it out. The crispy texture of these little guys is positively addictive. The combination of graininess from the cornmeal and thin buttery discs is just right. The sweetness is also exactly to my preference: sweet without being cloying, and balanced by tart chewy bursts of apricot fruit. They also keep really well, staying crisp in a tin for a few days (if I don't hand them all out in a cheap attempt to make new friends.)
Nevertheless, I have a true appreciation for the layer of complexity that the sage brings to these cookies. While it wasn't what I wanted for this particular batch, there was an element of depth that was lacking this time around. It will be fun to figure out what other flavors to try next time to add that sense of umami. In addition, while I chilled the dough for over 8 hours, and sliced the rounds very evenly, I didn't feel that they baked very evenly. Perhaps I need a new oven! A new insulated air-pocket cookie sheet! Presents for Lamb! Or, maybe just bake on sheets of parchment paper next time...

Apricot Cornmeal Cookies
makes about 40 cookies
1 stick (1/2 cup) unsalted butter, softened
3/4 cup sugar
1 large egg
3/4 cup plus 2 tablespoons all-purpose flour
1/2 teaspoon baking powder
1/2 cup finely ground cornmeal
1/2 teaspoon salt
1/4 cup chopped dried apricots
Cream together butter and sugar. Mix in egg. Whisk together flour, cornmeal, baking powder, and salt. Blend into butter mixture until combined. Stir in chopped apricots.
Roll in wax paper or plastic wrap into a 2" diameter log and chill at least 4 hours or up to one week. (Can also be frozen).
Preheat oven to 350. Line baking sheet with parchment paper. Slice chilled log into 1/4" thick slices and lay 1 inch apart on cookie sheet. Bake 11 minutes or until golden. Cool on racks.
Wednesday, August 1, 2012
Vanilla Ice Cream and Pistachio Ice Cream
Baking is how I show that I am a thoughtful and considerate person. Other bakers always realize the time and care that goes into a lovely and delicious baked treat. Non-bakers are precisely that because they realize the time and care that is required for such a creation. So when I was told I didn't need to make my dad a birthday cake to celebrate his #66, I was a bit disappointed. There isn't much my dad needs or wants by way of presents, and it always feels like a special gift when I can present a dessert that I've planned and worked on for hours or more.
What happened is actually a wonderful story, and of all possible reasons to preempt my cake for my dad, I'm glad this was why. But more on that in a minute. My plan had been a second rift on the peach cake. I loved the version made with peach sauce, but like I described in the post, it was a dense cake. I wanted to see if I could make something just as fruity but more pillowy. I happen to adore chiffon cake, and thought that could be a good place to start.
Chiffon cakes are made with oil (instead of butter) and lots of eggs beaten with lots and lots of air to make them rise tall. They have a very light and spongy mouthfeel that can be great with summer fruit toppings. I have made some wonderful citrus (orange, lemon, and lime) chiffon cakes. They are baked in a tube pan and generally not frosted, so in some ways can be less fussy than a layer cake. Their shape makes them a perfect platform for a drizzle of glaze and a mini-bouquet of fresh flowers or fruit bursting from the center. Or, in celebration of my cream-loving father's birthday, perhaps a scoop of homemade ice cream???
A comparison of many different flavors of recipes shows the proportion of ingredients unchanging... each with a substantial volume of liquid. To me, this seemed exactly how I could replace peach sauce into the batter to get the fruit flavor and sweetness without negatively affecting the texture.
So, I had my peach sauce bubbling on the stove when I got a phone call from my mom. "If you haven't already started dad's cake..."
"I haven't done anything that can't be preserved."
"We'll still want the homemade ice cream..."
She went on to tell me that a Japanese friend of hers had just taken the United States naturalization exam and become a citizen. The friend was so excited and wanted to share her joy. She brought my mom a loaf shaped cake decorated with an American flag.
The cake was actually quite good, but it tasted especially delicious since it represented how individuals can make a home and a life in the United States. Or, maybe it was my ice cream that tasted so delicious?
Vanilla Ice Cream
from Gourmet magazine
2 cups heavy cream
1 cup whole milk (I use 2 tablespoons of cream and top up to 1 cup with skim milk)
3/4 cup sugar
1/8 teaspoon salt
2 eggs (room temperature if possible)
2 teaspoons vanilla (I prefer clear Mexican vanilla extract)
1 scant tablespoon high-quality vodka
Heat until simmering cream, milk, sugar, and salt. In separate bowl, whisk together eggs. Slowly stir in 1/4 cup of hot cream mixture. Gradually whisk in remaining cream mixture and test temperature. If not 160 degrees, return to saucepan and heat - whisking constantly - until temperature reaches 160 degrees.
Remove from heat and stir in vanilla. Chill mixture overnight. Stir in vodka. Freeze in ice cream maker. Serve right away for a soft-serve like consistency, or transfer to a container and freeze 1-2 hours or up to 1 week.
My first exposure to pistachio ice cream was in fourth grade when we made it in science class. The teacher is beloved for causing her students to virtually burst with excitment over science, but making ice cream in class didn't hurt her reputation. Sadly, I can't be sure what the science lesson was that day, but I'm pretty sure it had to do with the freezing temperature of salt water. In any case, I don't know how long it would have been otherwise before I would have heard of pistachio ice cream on my own, because my favorite was - and still is - vanilla. (see above)
Fast forward 23 years and it's more than probable that some pistachio gelato passed my lips in Italy. Given the number of stops we made for ice cream and that each stop generally included at least three and sometimes up to five different flavors, it's almost a statistical certainty that pistachio was a selection at one point. Again, sadly, I don't quite recall the details.
But when a friend recently mentioned that her favorite flavor of ice cream is pistachio, I jumped on the opportunity to make her some fresh. The key is to steep ground nuts in the cream mixture and then strain before churning for an intense flavor but ultra-smooth texture. I didn't want to mix in chopped nuts, so I just sprinkled them on top for serving.
Pistachio Ice Cream
2 cups heavy cream
1 cup whole milk (I use 2 tablespoons of cream and top up to 1 cup with skim milk)
1 1/3 cups pistachios
3/4 cup sugar
1/8 teaspoon salt
2 eggs (room temperature if possible)
1/2 teaspoons almond extract
1 scant tablespoon high-quality vodka
Grind nuts in food processor until they are a coarse meal. Heat to a simmer 1 cup cream and one cup milk with sugar and salt. Stir in ground nuts, cover, and allow to steep about an hour.
Pour mixture through a fine mesh strainer to remove nut particles, add remaining one cup cream, then heat again to a simmer. Whisk eggs in a separate bowl and slowly whisk hot cream mixture into beaten eggs (doing this slowly prevents the eggs from cooking and forming curds.) Return the entire mixture to the saucepan and heat to 160 degrees, whisking constantly. Strain again into a clean bowl, stir in almond extract, and refrigerate at least 8 hours. Stir in vodka before churning. Serve topped with chopped pistachios.
What happened is actually a wonderful story, and of all possible reasons to preempt my cake for my dad, I'm glad this was why. But more on that in a minute. My plan had been a second rift on the peach cake. I loved the version made with peach sauce, but like I described in the post, it was a dense cake. I wanted to see if I could make something just as fruity but more pillowy. I happen to adore chiffon cake, and thought that could be a good place to start.
Chiffon cakes are made with oil (instead of butter) and lots of eggs beaten with lots and lots of air to make them rise tall. They have a very light and spongy mouthfeel that can be great with summer fruit toppings. I have made some wonderful citrus (orange, lemon, and lime) chiffon cakes. They are baked in a tube pan and generally not frosted, so in some ways can be less fussy than a layer cake. Their shape makes them a perfect platform for a drizzle of glaze and a mini-bouquet of fresh flowers or fruit bursting from the center. Or, in celebration of my cream-loving father's birthday, perhaps a scoop of homemade ice cream???
A comparison of many different flavors of recipes shows the proportion of ingredients unchanging... each with a substantial volume of liquid. To me, this seemed exactly how I could replace peach sauce into the batter to get the fruit flavor and sweetness without negatively affecting the texture.
So, I had my peach sauce bubbling on the stove when I got a phone call from my mom. "If you haven't already started dad's cake..."
"I haven't done anything that can't be preserved."
"We'll still want the homemade ice cream..."
She went on to tell me that a Japanese friend of hers had just taken the United States naturalization exam and become a citizen. The friend was so excited and wanted to share her joy. She brought my mom a loaf shaped cake decorated with an American flag.
The cake was actually quite good, but it tasted especially delicious since it represented how individuals can make a home and a life in the United States. Or, maybe it was my ice cream that tasted so delicious?
Vanilla Ice Cream
from Gourmet magazine
2 cups heavy cream
1 cup whole milk (I use 2 tablespoons of cream and top up to 1 cup with skim milk)
3/4 cup sugar
1/8 teaspoon salt
2 eggs (room temperature if possible)
2 teaspoons vanilla (I prefer clear Mexican vanilla extract)
1 scant tablespoon high-quality vodka
Heat until simmering cream, milk, sugar, and salt. In separate bowl, whisk together eggs. Slowly stir in 1/4 cup of hot cream mixture. Gradually whisk in remaining cream mixture and test temperature. If not 160 degrees, return to saucepan and heat - whisking constantly - until temperature reaches 160 degrees.
Remove from heat and stir in vanilla. Chill mixture overnight. Stir in vodka. Freeze in ice cream maker. Serve right away for a soft-serve like consistency, or transfer to a container and freeze 1-2 hours or up to 1 week.
 |
| Pistachio ice cream |
Fast forward 23 years and it's more than probable that some pistachio gelato passed my lips in Italy. Given the number of stops we made for ice cream and that each stop generally included at least three and sometimes up to five different flavors, it's almost a statistical certainty that pistachio was a selection at one point. Again, sadly, I don't quite recall the details.
But when a friend recently mentioned that her favorite flavor of ice cream is pistachio, I jumped on the opportunity to make her some fresh. The key is to steep ground nuts in the cream mixture and then strain before churning for an intense flavor but ultra-smooth texture. I didn't want to mix in chopped nuts, so I just sprinkled them on top for serving.
Pistachio Ice Cream
2 cups heavy cream
1 cup whole milk (I use 2 tablespoons of cream and top up to 1 cup with skim milk)
1 1/3 cups pistachios
3/4 cup sugar
1/8 teaspoon salt
2 eggs (room temperature if possible)
1/2 teaspoons almond extract
1 scant tablespoon high-quality vodka
Grind nuts in food processor until they are a coarse meal. Heat to a simmer 1 cup cream and one cup milk with sugar and salt. Stir in ground nuts, cover, and allow to steep about an hour.
Pour mixture through a fine mesh strainer to remove nut particles, add remaining one cup cream, then heat again to a simmer. Whisk eggs in a separate bowl and slowly whisk hot cream mixture into beaten eggs (doing this slowly prevents the eggs from cooking and forming curds.) Return the entire mixture to the saucepan and heat to 160 degrees, whisking constantly. Strain again into a clean bowl, stir in almond extract, and refrigerate at least 8 hours. Stir in vodka before churning. Serve topped with chopped pistachios.
Subscribe to:
Posts (Atom)